> For the complete documentation index, see [llms.txt](https://help.craftsmanplus.com/llms.txt). Markdown versions of documentation pages are available by appending `.md` to page URLs; this page is available as [Markdown](https://help.craftsmanplus.com/home/release-notes/readme.md).
# Release Notes
New updates and improvements
{% updates format="full" %}
{% update date="2026-10-19" tags="new-release" %}
## **PLAY v5.4**
MULTIPLAYER. RICH TEXT. CONDITIONAL PROGRESSION. MORE PLAY.
#### New Features
***
#### **Multiplayer** *Build together, in real time*
Anyone with edit access can now work in the same creative at the same time. The first-user edit lock is gone, so you no longer drop to read-only because a teammate opened the creative before you did.
Other people's edits appear live, with no reload needed. An avatar strip at the top of the Editor shows who is in the creative with you, and each person gets their own color. Their cursors and selections show on the canvas in that color, and a badge on each scene shows where they are working. Click someone's avatar to follow them around the Editor and see exactly what they are doing. Project settings stay in sync too, so a size or setting change made by one person reaches everyone.
Read the Multiplayer Documentation
***
#### **Rich Text & Google Fonts** *Mixed styles in one text layer*
Text layers picked up a major set of upgrades this release:
**Rich text.** You can now mix styles inside a single text layer. Double-click a text layer to edit it on the canvas, select any word or range, and the Text Properties panel applies font, size, style, solid or gradient color, letter spacing, line height, and baseline position to just that selection. No more stacking and lining up separate text layers to get one bold, colored word in a sentence. Font, style, and color are shared across orientations, while size and alignment are still set per orientation. Press Enter for a line break, and Esc or Cmd+Enter (Ctrl+Enter on Windows) to finish editing.
**Google Fonts.** Browse and apply Google Fonts right in PLAY, with no downloading or uploading. Click the font selector on any text layer to open the new font picker. The Library tab holds your uploaded and global fonts, and the Google tab holds a curated set of Google Fonts. Both tabs have search and visual previews. Each font family now appears as a single item, and you choose its weight or italic from the new Style dropdown next to the font selector.
**Auto Size.** A new Auto Size toggle sits just below the font size selector. With it on, text scales to fit its box whenever you resize the layer or change the copy, so the text box works as a safe area your content always fits inside. Typing a specific font size turns it off, and the setting is stored separately for portrait and landscape. New text layers start with Auto Size on.
Read the Text Layer Documentation
***
#### **Gradient Colors** *A rebuilt color picker with gradient fills*
The color picker has been rebuilt with Solid and Gradient tabs, so you can apply gradient fills to text, shapes, scene backgrounds, and color effects. Choose from five gradient types: Linear, Radial, Angular, Reflected, and Diamond. Set the direction, then click or drag along the gradient bar to add and position stops, with a percentage readout as you drag. Each stop uses the same controls you already know for solid colors, including hex, opacity, and a new eyedropper. The picker itself is now draggable, so you can move it out of the way of your work.
Gradients also come in from your source files. Photoshop imports now bring gradient fills on shape layers in as editable gradients, and SVG uploads keep the gradients defined in the original file.
Read the Color Selector Documentation
***
#### **Scene Backgrounds** *Every scene gets its own backdrop*
Scenes now have their own background. Select a scene and use the new Background field in the Properties panel to set a solid color or gradient, with adjustable opacity. Each scene keeps its own background, and changes show live in the viewport.
**Content Blur**, on by default, fills any space beyond the artboard with a heavily blurred, live version of the scene. Playables shown at a different aspect ratio no longer expose a black edge.
Read the Scenes Documentation
***
#### **New Effects: Color Overlay & Color Underlay** *Tints, flashes, and backing plates without new assets*
Three new effects join Opacity in the Effects section. [**Color Overlay** ](/play/properties/effects/color-overlay.md)fills a layer's visible pixels with a color for hit flashes, tints, and silhouettes. [**Color Underlay**](/play/properties/effects/color-underlay.md) adds a backing plate behind the layer. Both take solid or gradient fills. [**Blend Mode**](/play/properties/effects/blend-mode.md) changes how a layer mixes with everything beneath it using the familiar Photoshop modes, like Multiply for shadows and Screen for glows.
All three work on image, text, video, sequence, and shape layers. Paste Properties now carries effects between layers, and Photoshop imports convert layer opacity into an Opacity effect.
Read the Effects Documentation
***
#### **Conditional Progression** *One action, many outcomes*
Conditional is a new action in the action selector, directly below Update Progression. Select it, click Configure, and a full-screen canvas opens where you build IF, ELSE IF, and ELSE chains from any variable in your project, combine conditions with AND or OR, and fire multiple actions per branch.
The Available Variables panel lists everything your conditions can reference, grouped into Scene, Progression, and Game, and a single condition can mix variables across groups. Add as many independent IF blocks as you need. For example, add a Conditional at the end of a scene that checks the final score: IF Score <= 33 go to Scene 2A, ELSE IF Score <= 66 go to Scene 2B, ELSE go to Scene 2C.
Read the Conditionals Documentation
***
#### **Hide/Show Action Upgrades** *Start hidden, reveal on cue*
The hide/show toggle in the layers panel now sets a layer's starting visibility. Build a layer that starts hidden and reveal it later with a Show Layer action. This works on any layer. Hidden layers that a Show or Hide action targets are now included in your export, Project Score, and file size. Hidden layers with nothing targeting them are still left out, so you keep the file size saving.
Hide and Show Layer actions now hold their state on global layers. Hide a global layer in one scene and it stays hidden as you move between scenes, until the playable restarts.
Read the Hide/Show Layer Documentation
***
#### **Launch URL Upgrade** *One action for every device*
Launch App Store and Launch URL are now a single Launch URL action, with separate iOS, Android, and Desktop fields so it's clear which link opens on which device. Existing projects update automatically, and App Store links move into the matching fields. Empty fields show your project's Autofill URLs as placeholders, and a Device Click Out Limitation warning appears if Launch URL is triggered by anything other than a Single Tap, since devices can block click-outs from other gestures.
Read the Launch URL Documentation
***
#### **Asset Library Upgrades** *Multi-select, bulk actions, and a cleaner grid*
**Multi-select and bulk actions.** Hover any tile to reveal its selection radio and Options menu, then Delete, Download, or Move the whole selection at once. Drag a selection onto a folder tile to move it there. Downloading a folder or a multi-selection gives you a zip that keeps your folder structure, and bulk deletes show their progress as they run.
**Redesigned tiles.** Asset and folder tiles now show file type and size, plus duration on video and audio. Audio tiles have playback built in, and video tiles play on click. The Folders section is collapsible, and the grid supports keyboard navigation.
**Smarter filtering.** An Asset Types filter now sits in the header at all times, and it pre-selects the relevant types when you open the library to add or replace a layer. The page URL keeps your current folder, filters, and sort, so a link or a refresh lands you exactly where you were.
Read the Asset Library Documentation
***
#### **Project Management Upgrades** *Organize at scale, start faster*
**Multi-select and bulk actions.** The Projects listing now supports multi-select. Click once to select a project or folder and double-click to open it, or press Cmd+A (Ctrl+A on Windows) to select everything in view. Archive, delete, and move many projects at once from the context menu, with confirmations and progress as they run. Rename and Duplicate now open dedicated dialogs that handle duplicate names for you.
**Filter, sort, and search.** The listing header gains a project type filter, sort options, and search in one row.
**A redesigned New Project window.** Creating a project now happens on a single setup screen with three ways to start: Generate, Template, and Blank. Name your project, choose a folder and project type, and a live preview on the right updates as you go.
**Generate** takes a prompt, an optional URL, and any assets you add. Click Generate and the project is created and opens in the Editor with INTELLIGENCE alongside it, your prompt already sent, so the build starts right away. **Template** lets you browse and preview templates without leaving the window, then reskin your pick with your own URL and assets. **Blank** creates an empty project with orientation, artboard size, and CTA links set up front.
Read the Projects Documentation
***
#### **Dashboard Revamp** *Start from a prompt*
The dashboard now opens with INTELLIGENCE front and center: a personalized greeting and a prompt input with preset chips for Creative Generation, Creative Strategy, Concept Ideation, Analytics Insights, and Design Recommendations. Send a message or click a chip to go straight into the full-screen INTELLIGENCE view. If you prompt your way into a project from there, the conversation carries over with you into the Editor.
Your existing dashboard content is still there. Scroll down past the chat to reach Recent Projects and Company Stats. The dashboard's new gradient background has also rolled out across the rest of the platform.
Read the Dashboard Documentation
***
#### **Users & Permissions** *Clear roles, clear access*
The Users tab in Company Settings has been rebuilt. Admins can add, edit, remove, and restore users, reset passwords, and set each person's role and admin access from one place. Company Settings is now limited to admins.
Roles now carry through the platform. Users who can't edit a project open it read-only, and actions a role can't use, such as Share Link or Export, are hidden or explained instead of failing silently.
Read the Users & Permissions Documentation
***
#### **Code Layer Upgrades** *Shaders and Spine animations*
**Shaders.** Code layers now support shader effects, which change how a layer's pixels are drawn: a ripple on tap, a heat shimmer, a glow, a dissolve, or a color grade that cycles over time. Apply a shader to individual elements inside the code layer or to the whole layer. Shaders can respond to taps, pointer movement, and progression, and they render the same in the Editor, Preview, and the exported playable. Fine-tune values like speed, intensity, and color in the Properties panel and see the result update live.
**Spine animations.** Code layers now support Spine animations, with the packaged files and images editable from the Properties panel.
Read the Code Layer Documentation
***
UI/UX IMPROVEMENTS
* **Interactions on group layers.** Group layers can now have their own interactions.
* **Double-click to edit.** Double-click a Game, Component, or Code layer on the canvas to open its edit mode.
* **Space to play.** Press Space to play and pause the timeline without disrupting canvas panning.
* **Reorder from the timeline.** Drag layers to reorder them in the timeline's layers panel.
* **Custom game duration.** Game layers can now have a custom duration independent of Autoplay.
* **Media follows the playhead.** Autoplay videos and sequences now stay in sync with the playhead when you play the timeline.
* **Smoother nudging.** Holding an arrow key now nudges the selected layer continuously.
* **Properties panel keeps its place.** The Properties panel keeps its scroll position, and open popups stay open, when you switch between layers.
* **Hidden layers stay visible while selected.** Selecting a hidden layer in the layers panel now shows it at 25% opacity in the viewport.
* **Resizable layers panel.** Drag the right edge of the layers panel to resize it.
* **Better Pathview framing.** Pathview now opens at a comfortable zoom level instead of zooming past the scene size.
* **Share Link hotkeys.** The share link header and size dropdown now show their keyboard shortcuts.
* **True circles.** Switching a shape from Rectangle to Circle now gives you a true circle.
* **Refreshed loading screens.** The platform and Editor loading screens use the new system gradient, stay up until the viewport is ready, and fade out smoothly.
* **Cleaner artboards.** The PLAY and CANVAS logos have been removed from Editor artboards.
* **Consistent menus and dropdowns.** Menus and dropdowns across the platform now share one standardized design.
* **Call Number preview.** Triggering Call Number in Preview now shows a dialogue with the number instead of a toast.
* **Shape layers in HTML banners.** Shape layers are temporarily unavailable in HTML banner ads.
BUG FIXES
* Fixed an issue where edits made inside an object another user had just changed were never saved in Multiplayer.
* Fixed an issue where the Editor stopped receiving live updates and never reconnected after a server error in Multiplayer.
* Fixed an issue where remote cursors pointed at the wrong place when collaborators had different screen sizes.
* Fixed an issue where a layer moved out of a group was deleted along with the group.
* Fixed an issue where Photoshop import assets disappeared from PLAY after import.
* Fixed an issue where Trigger Audio in code layers did not play in share links.
* Fixed an issue where Trigger Audio did not fire in share links and exports when used with Update Progression conditions.
* Fixed an issue where .oga audio files were rejected as unsupported.
* Fixed an issue where Launch URL on a looping sequence opened the link multiple times.
* Fixed an issue where opening a PLAY project triggered a clipboard permission prompt.
* Fixed an issue where Cmd+S or Ctrl+S opened the browser's save dialog and interrupted saving.
* Fixed an issue where a cut and pasted image layer did not appear on the artboard.
* Fixed an issue where a pasted layer reverted to the original layer's size each time you returned to its scene.
* Fixed an issue where transform values jumped back after copying a layer into another scene.
* Fixed an issue where undoing Add to Global Layers left a nameless child layer behind.
* Fixed an issue where a child global text layer unsynced its text properties after editing its text.
* Fixed an issue where arrow key nudges moved layers by the wrong amount.
* Fixed an issue where a layer track could not be dragged by its enter or exit animation area on the timeline.
* Fixed an issue where zooming the timeline to maximum caused page scroll bars to appear.
* Fixed an issue where changing a gesture to Drag caused a validation error.
* Fixed an issue where a shape's bounding box did not include its stroke.
* Fixed an issue where text extending past its bounding box was hidden until the layer changed.
* Fixed an issue where text layers showed their default color in Preview and Share Link instead of the custom color.
* Fixed an issue where the font size field accepted negative values and broke rendering for some values.
* Fixed an issue where an uploaded font did not appear in the font picker until the page was reloaded.
* Fixed an issue where layer bounding boxes rendered twice as thick as expected.
* Fixed an issue where the artboard size label showed pixel values instead of the ratio on project open.
* Fixed an issue where iFrame components blinked when Content Blur was on, and uploaded HTML files did not display in Preview.
* Fixed an issue where some partner exports rendered black.
* Fixed an issue where Digital Turbine exports split Trade Desk tracker URLs containing a comma.
* Fixed an issue where catalogue dynamic conditions showed no bound layers and swapping failed.
* Fixed an issue where Pathview showed scenes started from a code layer as isolated.
* Fixed an issue where the Version Restore list's Load More did not work.
* Fixed an issue where a folder could be moved inside one of its own child folders.
* Fixed an issue where pages bounced vertically when scrolling with a trackpad.
* Fixed an issue where a brief network error signed users out.
* *Release includes other minor bug fixes.*
{% endupdate %}
{% update date="2026-09-23" %}
## **INTELLIGENCE v1.0**
Out of BETA. Eight Specialties. Endless Possibilities.
CRAFTSMAN INTELLIGENCE is now generally available across CRAFTSMAN+. It is the AI chatbot built into the platform: describe what you need in plain language and it plans, builds, edits, generates, reviews, and analyzes on your behalf. Beta is over. This release covers everything INTELLIGENCE can do today.
***
#### **One Chat, Eight Specialties** *Plain language in. The right expertise out.*
{% embed url="" %}
INTELLIGENCE covers eight areas of the playable workflow. Four advise: Creative Strategy, Concept Ideation, Design Recommendations, and Analytics Insights. Four act on your project: Creative Generation, Builder Agent, Feature Generation, and Asset Generation. There is nothing to select. Describe what you want in plain language, whether that is a headline resized, a design reviewed, or a new mechanic drafted, and INTELLIGENCE handles it as one system.
Read the Quickstart Guide
***
#### **Creative Generation** *A whole playable from a brief, a video, a Photoshop file, or a template*
Start from what you already have. A prompt, an App Store URL, a video or static ad, a Photoshop file, or a template becomes a working playable. INTELLIGENCE builds it from scratch using your assets or generating new ones, matching your branding and gameplay. Drop in a video ad and it comes back as a playable with the same visual style and mechanics.
Every generated playable becomes a fully editable project in PLAY. Fine-tune it by hand, or keep refining with the chatbot until it's exactly right.
Read the Creative Generation Documentation
***
#### **Builder Agent and Feature Generation** *Edit anything. Build Everything*
Inside the PLAY Editor, the [**Builder Agent** ](/intelligence/specialties/markdown.md)edits your project through conversation: text and copy across every scene, layout, alignment and responsivity, timeline and animations, interactions and hotspots, scenes, global layers, dynamic content, game mechanics and components, settings, and asset cropping and optimization. It can also find and fix project score violations. Give it one precise command, several at once, or a goal, and it explains what it changed.
[**Feature Generation**](/intelligence/specialties/feature-generation.md) covers what the built-in layers cannot. Describe a mini-game, a particle effect, a prize wheel, or a before-and-after slider and INTELLIGENCE builds it as a Code Layer in your project. It behaves like any other layer: colors, speeds, and toggles sit in the Properties panel as editable properties, so everything stays adjustable after it's generated.
Play a Demo
***
#### **Asset Generation** *Images, SVG shapes, music, sound effects, and voiceover, all in the chat*
Ask for a background, a mascot, a product shot, or a set of icons and the image appears in the conversation. Ask for a custom SVG, a logo shape or a UI element, and you get clean vector you can scale and recolor in the editor. Ask for upbeat background music, a button click, or a "You Win" voice line and a clip appears with an inline player. Give it reference images, a URL, or a brand guidelines PDF and the results follow your look.
Nothing is saved or placed unless you choose. Every generated asset offers **Add Layer** and **Save to Asset Library**, so you can generate freely and keep only what works. Other specialties call on Asset Generation as they go: a reskin that needs missing artwork generates it in place.
Read the Asset Generation Documentation
***
#### **Strategy, Concepts, and Review** *Know what to build.*
[**Creative Strategy**](/intelligence/specialties/creative-generation.md) tells you what to build before you build it: trending concepts, hooks, mechanics, competitor activity, and what performs on which network, by vertical and by KPI.
[**Concept Ideation**](/intelligence/specialties/integrations.md) turns a direction into a storyboard: a summary, a scene-by-scene breakdown from hook to end card, and the list of PLAY features you will need. Take it straight into the Builder Agent.
[**Design Recommendations**](/intelligence/specialties/editor.md) reviews your open project like a senior designer: hierarchy, typography, contrast, imagery, CTA placement, and playable best practices. Upload your brand guidelines and it checks against them. It tells you what to change; the Builder Agent makes the change.
***
#### Analytics Insights *Ask your data what to build next*
Analytics Insights turns your performance data into a conversation. Ask where users drop off and it names the scene. Ask why one variant beat another and it explains the difference. Ask which partner is driving captures, whether iOS and Android behave differently, or what your top performers have in common, and the answer comes back from your real numbers, not a dashboard you have to interpret yourself.
This is pre-click data at work. Every interaction inside the ad is a signal: which layers get touched, how long people stay, where the end card loses them. INTELLIGENCE reads those signals and tells you what to build next, so the loop closes inside the same tool that made the creative. Diagnose, revise, export, and ask again.
Read the Analytics Insights Documentation
***
#### **Bring Your Context** *Files, links, your selection, and your company's rules*
Attach images, PDFs, audio, video, and fonts by upload, from the Asset Library, by drag and drop, or by paste, up to 20 files per message. Paste a website or App Store link and INTELLIGENCE reads it. Select layers on the canvas and refer to them as "these layers". Any image or clip already in the conversation can be selected and reused without re-uploading.
Company admins can set **Company Instructions** and **Company Skills** in Company Settings. Instructions are standing context, such as brand rules and naming conventions, applied to every conversation across your company. Skills are reusable instructions for tasks you run repeatedly. Write them once; every user gets them.
Read the Company Settings Documentation
***
#### **Everywhere You Work** *Four views, saved history, navigation, and web search*
INTELLIGENCE is available on every page of CRAFTSMAN+, with or without a project open. Choose **Popup View**, **Panel View**, **Fullscreen View**, or **Window View** from the Change View menu; your conversation carries across every switch, and Window View puts the chat in its own browser window for a second monitor. Press **⌘ Shift O** or **Ctrl + Shift + O** anywhere to start a new chat.
Every conversation is saved. **History** groups chats into Favorites, your current project, and everything else, with search, rename, favorite, and delete. Ask INTELLIGENCE to take you anywhere in the platform, from a project's analytics to the Asset Library, and it navigates for you. When a question needs current information, it searches the web and works the results into its answer.
Read the Chatbot Documentation
{% endupdate %}
{% update date="2026-08-17" %}
## **PLAY v5.3**
CUSTOM SHAPES. POWERED-UP CODE LAYERS. MORE PLAY.
### New Features
***
### **Custom Shapes *****Bring any shape into PLAY***
Shape layers are no longer limited to rectangles and circles. You can now upload SVGs to the Asset Library as a new Shape asset type, and any SVG can be used as its own fully editable shape layer. When a shape is anything beyond the presets, the Shape dropdown displays "Custom," and you can switch back to a preset at any time.
Custom shapes support the same customization you already know. Edit the fill color and opacity right in the Properties panel, and shapes with multiple colors get a color selector for each fill, plus a new picker for stroke color. The Replace button now shows both images and SVGs from your Asset Library, so you can swap an image for a shape (or a shape for an image) whenever you like.
A few more details: the Asset Library gains a Shape filter under Asset Types, custom shapes work with Global Layers, and they appear in the assets panel like any other shape. If an uploaded SVG isn't compatible with customization, you'll see a compatibility notice in the Properties panel, but the shape still renders and exports correctly.
Read the Shape Layer Documentation
***
### **Code Layer Upgrades *****Sound, physics, progression, and more***
The Code Layer picked up a major set of upgrades this release:
**Sound effects.** Code layers now have first-class audio support. When a code layer includes sound effects, a new Audio Module appears in its Properties panel. Open Audio Properties to swap, preview, or delete each sound and adjust its volume. Code layer audio also appears in the audio section of the assets panel, right alongside the rest of your project's sounds.
**2D physics engine.** Code layers now include a built-in 2D physics engine (matter.js), so falling objects, bouncing, stacking, and slingshot-style mechanics no longer require hand-written collision math. The physics API comes with full code editor support: autocompletion, a dedicated section in the API reference sidebar, and hover documentation. Physics is fully opt-in, so creatives that don't use it see no change in file size.
**Progression.** Code layers now use the same Variables and Triggers progression system introduced in v5.2. A new Progression section sits directly below the Code section in the Properties panel, where you can create variables, track them, and fire actions when they hit the conditions you set, exactly like game progression.
**Interactions at a glance.** Interactions configured inside a code layer are now visible outside the code editor. Any layer with a configured interaction shows a read-only Interaction section in its Properties panel with the gesture and action, so collaborators can see what's wired up without opening the code.
**Automatic engagement tracking.** Interactive code layers now feed the Analytics Dashboard automatically. Any layer with a configured interaction fires engagement events out of the box, so your code layer interactions show up in Total Engagements and Engagements by Layer with no extra setup.
Read the Code Layer Documentation
***
### **Effects *****Non-destructive visual effects, right in the editor***
Raising the visual fidelity of an asset used to mean baking the effect into your source art in Photoshop or After Effects and re-importing it for every tweak. Not anymore. A new Effects Section now sits in the layer Properties panel, just below Animations, and works exactly like the Interactions and Animations modules you already know: add an effect, pick its type, configure it inline, and remove it whenever you like. A single layer can hold multiple effects at once and everything renders in the exported playable exactly as it looks in the editor.
**Opacity** is the first effect to ship on the new system. Add it to a layer and set a value from 0 to 100%. **More effect types are coming soon!**
Read the Effects Documentation
***
### **Analytics Monitor *****Watch your events fire in real time***
You no longer need the browser's network panel to verify what a playable is tracking. A new Analytics Monitor button sits at the top right of both Preview Path view and Share Link view. Click it to open a panel showing running totals for Sessions, Total Engagements, and Total Captures, plus a live feed of every event as it fires, with friendly names like Engagement, Capture, Tracker Fired, Scene Started, and Finished. Event rows include helpful context such as the layer or scene that triggered them, and a reset button in the panel header clears everything for a fresh run.
Read the Analytics Event Monitor Documentation
***
### **Analytics Spreadsheet View & CSV Download *****Day-by-day performance, ready for export***
A new Spreadsheet view in the analytics sidebar presents your creative's performance as a day-by-day table. Each day is its own row showing Total Sessions, Sessions Engaged, Total Engagements, and Sessions Captured, plus a column for every layer in the creative so you can compare how individual elements performed over time. The table supports sorting by any column, pagination, and a sticky header and date column, and it respects the date range and filters you've already selected. When you're ready to dig deeper, hit Download CSV to export the data for Excel or Google Sheets, clearly named with the project, variant, date range, and company.
Read the Analytics Export Documentation
***
### **Redesigned Share Link Popup *****Share settings***
The Share Link popup has been rebuilt. Click the Share Link button in the toolbar (⌥⌘Q) to open the new draggable popup with your QR code up top and one-click Open URL and Copy URL actions, complete with a "Link copied" confirmation toast. Two share settings are now built right in: **Default Size** lets you choose which size the share link opens with, and **Lock Size** hides the size dropdown on the share link page entirely. Both previously existed only as hidden URL parameters you had to append by hand; now the popup builds the share URL for you. The same popup also comes to template preview sharing with QR code, Copy URL, and Open URL.
Read the Share Link Documentation
***
### **Export Updates *****Cleaner names, organized packages, all variants at once***
The export package is the final handoff to partners and clients, and it just got a lot more organized.
**A standardized naming convention.** Every exported file now follows a consistent format: `ExportPartner_ProjectName_VariantName_Date_CompanyName`. For example: `InMobi_Yahtzee_C03_ItemCatcherCardGame_V01_PlayNow_2025-06-01_Wildcards`. The convention applies to every file type a partner receives, so recipients can identify any file at a glance without opening it.
**A new package structure.** Exports now download as a single top-level zip (`Playables_Date.zip` or `Banners_Date.zip` for banner exports) containing one folder per export partner, with each partner's files inside in their required format. Every package also includes an instructions file linking to documentation, so whoever receives the export knows exactly what they're looking at.
**Include All Variants.** No more exporting variants one at a time. A new Include All Variants toggle at the bottom of the Export modal exports every variant of your project for each selected partner in a single go. The Export button count updates live so you always know exactly how many files you're about to generate: 3 partners with 3 variants gives you EXPORT (9).
Read the Export Documentation
***
### **Timeline Enhancements *****Precise timing, readable at a glance***
The timeline is where all your scene and layer timing lives, and it's been rebuilt to make that timing easier to read and far more precise to control.
**A refreshed design.** The timeline bar, panel, and tracks have been brought in line with PLAY's current design. Every control now has a tooltip, playback controls stay available even while the timeline is collapsed, and all time values display as clean whole numbers, no more stray decimals. You can also zoom the timeline by holding CMD (Mac) or CTRL (Windows) and scrolling, or by pinching on a trackpad.
**A smarter scene track.** The scene track now matches the structure of your layer tracks, with timestamps and notch marks overlaid directly on it. Drag the end of the scene track to change your scene's duration right on the timeline, no trip to the properties panel required.
**Animation timing on every track.** Layer tracks now visualize animation timing: layers with idle animations show playback notches, and enter and exit animation durations render directly on the track, so you can read your scene's choreography at a glance.
**Precision dragging and snapping.** Dragging a track or adjusting its start or end time now moves in 0.05 second increments, roughly one frame at 30fps, with the start time, end time, and total duration displayed live as you drag. Layer tracks snap to each other and to the scene end, and holding CMD or CTRL disables snapping when you want full freedom. Adjusting a parent's timing updates its children live as you drag.
**Layers beyond the scene end.** Layer tracks can now be dragged past the end of the scene, with the out-of-bounds portion darkened so it's clear that content won't play. Playback still ends at the scene duration.
**On Finish control.** Every layer gets a dedicated On Finish dropdown, giving you control over exactly what happens when a layer reaches the end of the timeline.
Read the Timeline Documentation
***
UI/UX IMPROVEMENTS
* **Engagements by Layer.** The Analytics Dashboard now breaks down engagements layer by layer, so you can see exactly which elements of your creative are driving interaction.
* **Redesigned color selector.** The color picker has been redesigned across the editor for faster, clearer color selection.
* **Panels remember where you were.** The layers panel, Properties panel, and timeline now keep their state when you switch between layers or jump in and out of Pathview, so you land back exactly where you left off.
* **Jump to scenes from Pathview.** You can now jump directly to a scene preview by clicking on it in the pathview.
* **Collapse projects.** Project groups in the Project Listing can now be collapsed to keep large workspaces tidy.
* **Rename before duplicating.** Duplicating a project now opens a rename popup first, so copies get a proper name instead of defaulting to "Copy."
* **Keep uploading while you upload.** You can now drag additional assets into the Asset Library while an upload is already in progress.
* **Faster editor on large projects.** Projects with many layers now load and scroll noticeably faster in the editor.
* **Cleaner input fields.** Number inputs now only show decimal places when the value actually has them.
* **Updated timeline controls.** The timeline section received a set of visual and usability updates.
* **Skip Time action.** The Skip to Time action is now Skip Time, with Skip Back and Skip Forward options.
* **Call Number action.** A new Call Number action lets a tap open the phone dialer with your number, complete with analytics tracking.
* **Smarter text layer defaults.** New text layers now start at font size 40 and sensible widths for portrait and landscape, and the font size dropdown presets have been updated.
* **Navigate the Asset Library with Escape.** Press Escape to step back through folders and close the Asset Library.
* **Asset Library stays put.** After editing an asset, the library now stays in that asset's folder instead of jumping back to the root.
* **Audio popups open on jump.** Jumping to an audio asset from the assets panel now automatically opens its properties popup.
* **Search survives filtering.** Applying filters or sorting on the Project Listing no longer resets your active search.
* **Template preview asset types.** Template previews now include a section listing the asset types used.
* **Global layers stay global.** Pasting a global layer or scene across projects now keeps it global instead of adding it as a normal layer.
* **Global Layer Interactions auto-unsync.** Targeting a scene-local layer from a global layer interaction now automatically unsyncs that section.
* **Code layer errors point to the line.** Code validation errors now include line and location info instead of leaving you hunting.
* **Decimals in Progression.** Progression input fields now support decimal values.
* **Share link loading state.** The share link page has an improved loading state with better loader placement and disabled controls while it loads.
* **Clearer location search.** Dynamic location search entries now show hierarchy sublabels so similar-looking locations are easy to tell apart.
* **Consistent tab titles.** Browser tabs now follow a consistent "Page - CRAFTSMAN+" format.
* **Artboard Size popup.** The Custom Artboard Size popup is now simply Artboard Size, with an updated design.
BUG FIXES
* Fixed an issue where exporting to all partners at once failed for some playable projects.
* Fixed an issue where AppLovin rejected exported creatives.
* Fixed an issue where a scene transition to the next scene did not trigger on share links, even though it worked in the editor preview.
* Fixed an issue where video layers did not show the edit (pencil) icon in the Properties header.
* Fixed an issue where copying a layer replaced the text on your clipboard.
* Fixed an issue where Scene and Group layers expanded or collapsed when selected instead of only via the arrow.
* Fixed an issue where searching the Asset Library opened unrelated folders as nested.
* Fixed an issue where the Asset Library added every asset type as an Image layer.
* Fixed an issue where the CTA click popup did not truncate long URLs and did not always show iOS, Android, and Desktop options.
* Fixed an issue where custom 90° horizontal flip animations were missing in share links.
* Fixed an issue where the top logo and final CTA button were missing from exported HTML builds.
* Fixed an issue where dynamic content layers failed to initialize on project open, leaving text layers missing.
* Fixed an issue where switching variants showed a file size of 0.00MB until the page was reloaded.
* Fixed an issue where the loading screen did not sit above all UI and editor state did not reset when switching variants.
* Fixed an issue where iFrame components rendered visually offset from their bounding box.
* Fixed an issue where Progress Text and Progress Bar min and max values reset to 0 and 100 when changed.
* Fixed an issue where inputtable selectors turned orange while typing.
* Fixed an issue where duplicating a project did not make the duplicator the new creator.
* Fixed an issue where Pathview did not highlight the first scene, and did not return to it when preview restarted.
* Fixed an issue where Analytics Pathview connectors rendered tiny.
* Fixed an issue where the Creative Insights toggle was not working.
* Fixed an issue where rectangle corner rounding only updated after a resize instead of live.
* Fixed an issue where scenes could not be collapsed in the left panel on the PSD import page.
* *Release includes other minor bug fixes.*
{% endupdate %}
{% update date="2026-07-10" %}
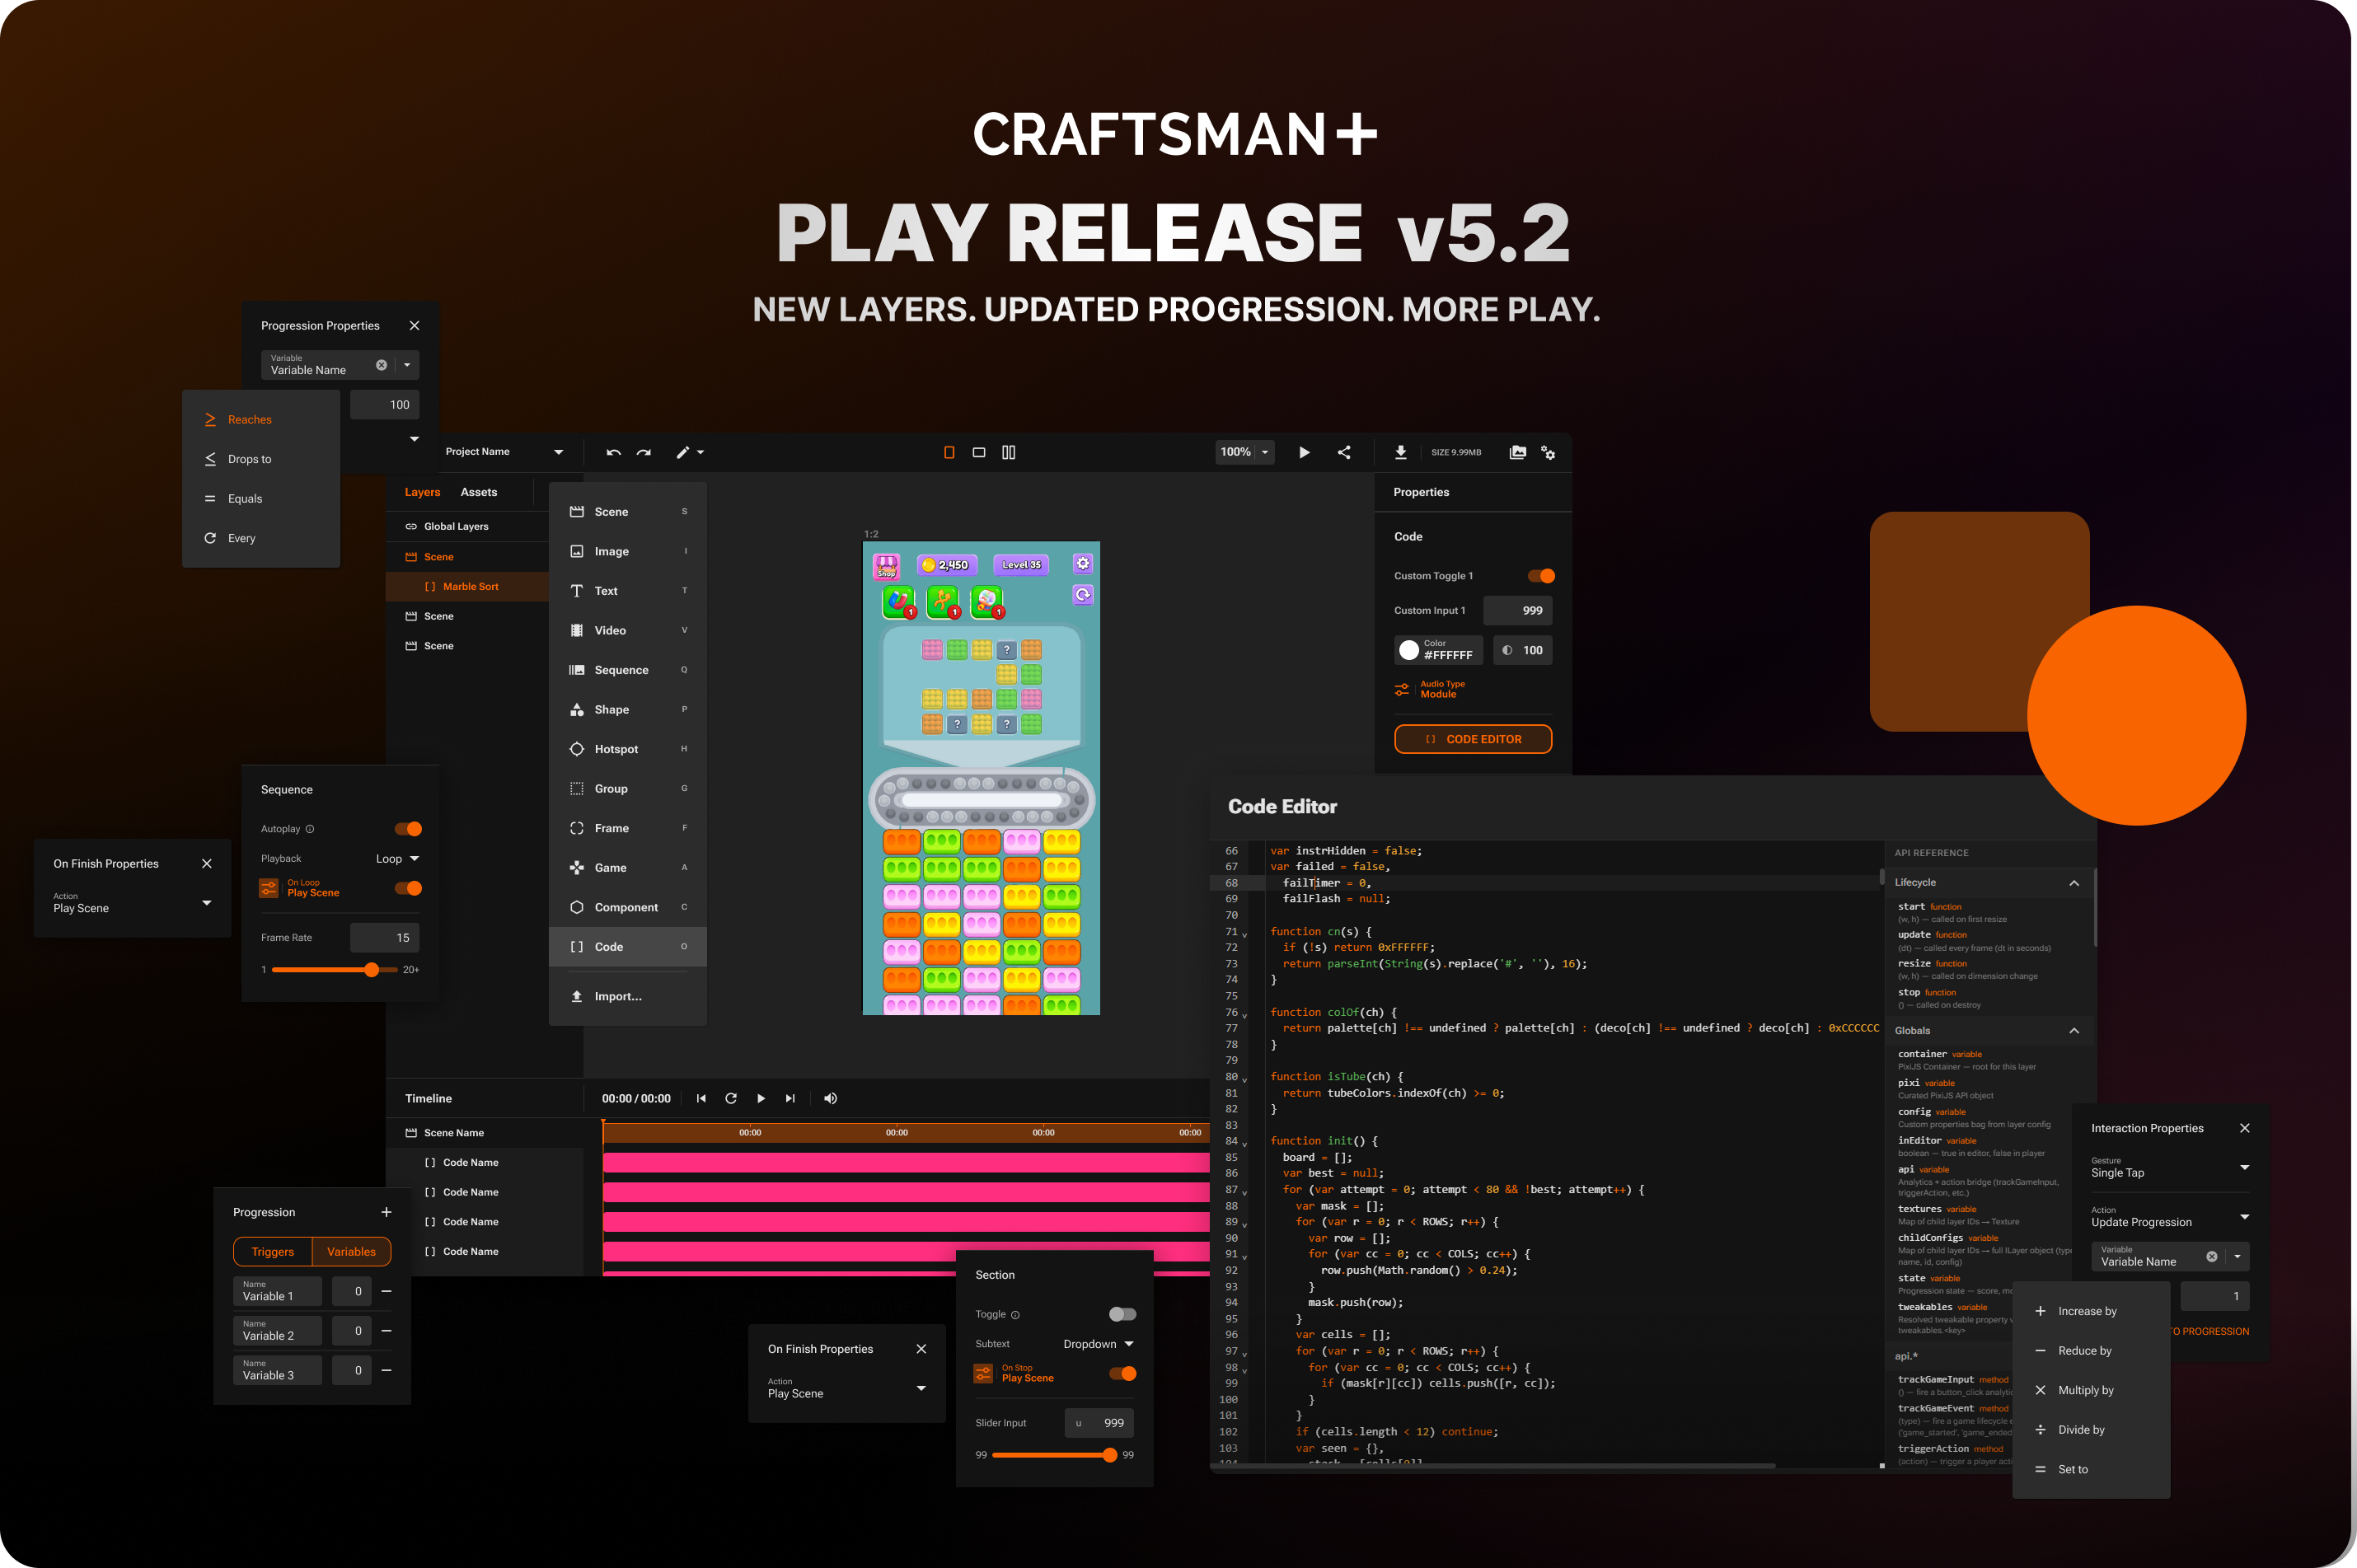
## **PLAY v5.2**
NEW LAYERS. UPDATED PROGRESSION. MORE PLAY.
### **New Features**
***
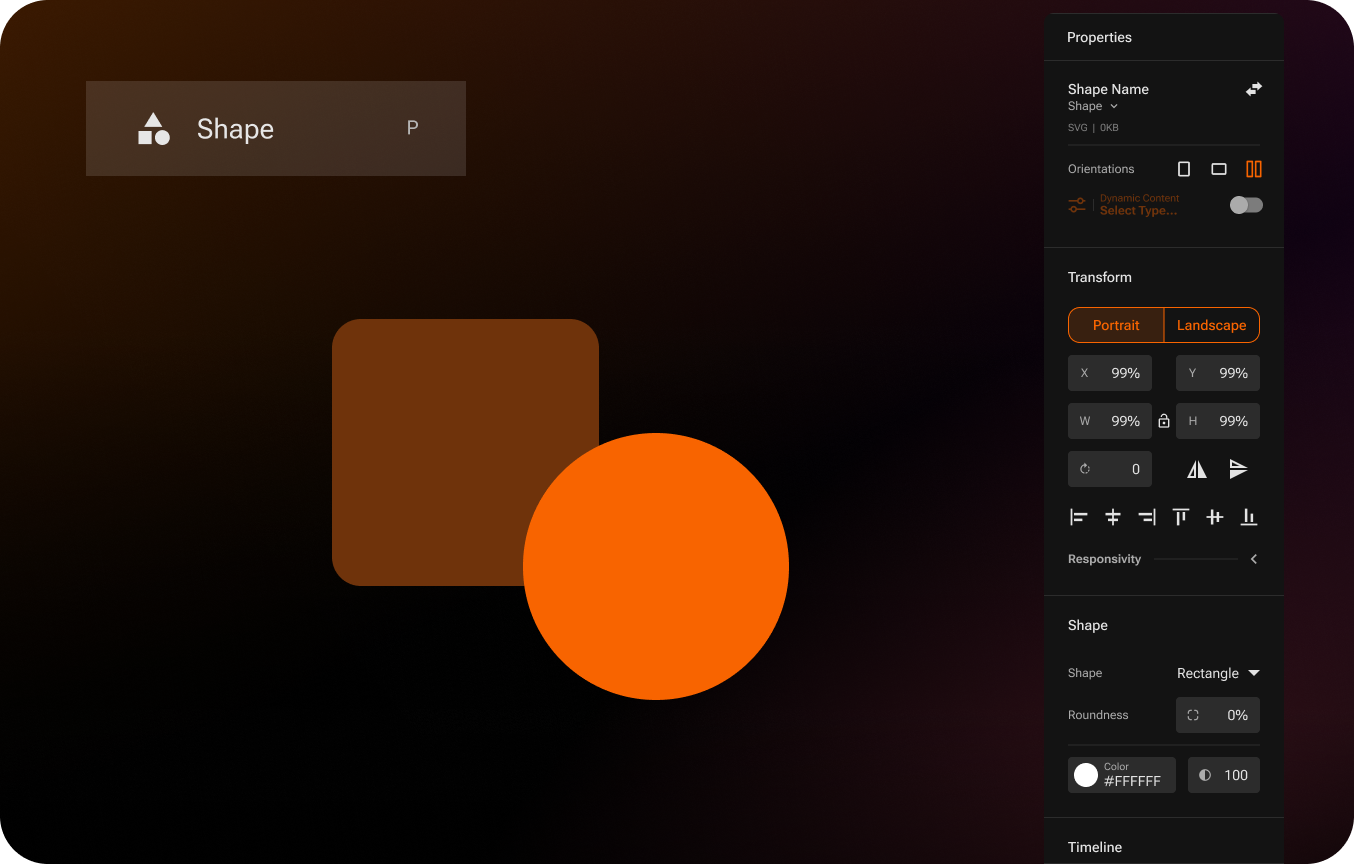
### **Shape Layers** *Build with native shapes*
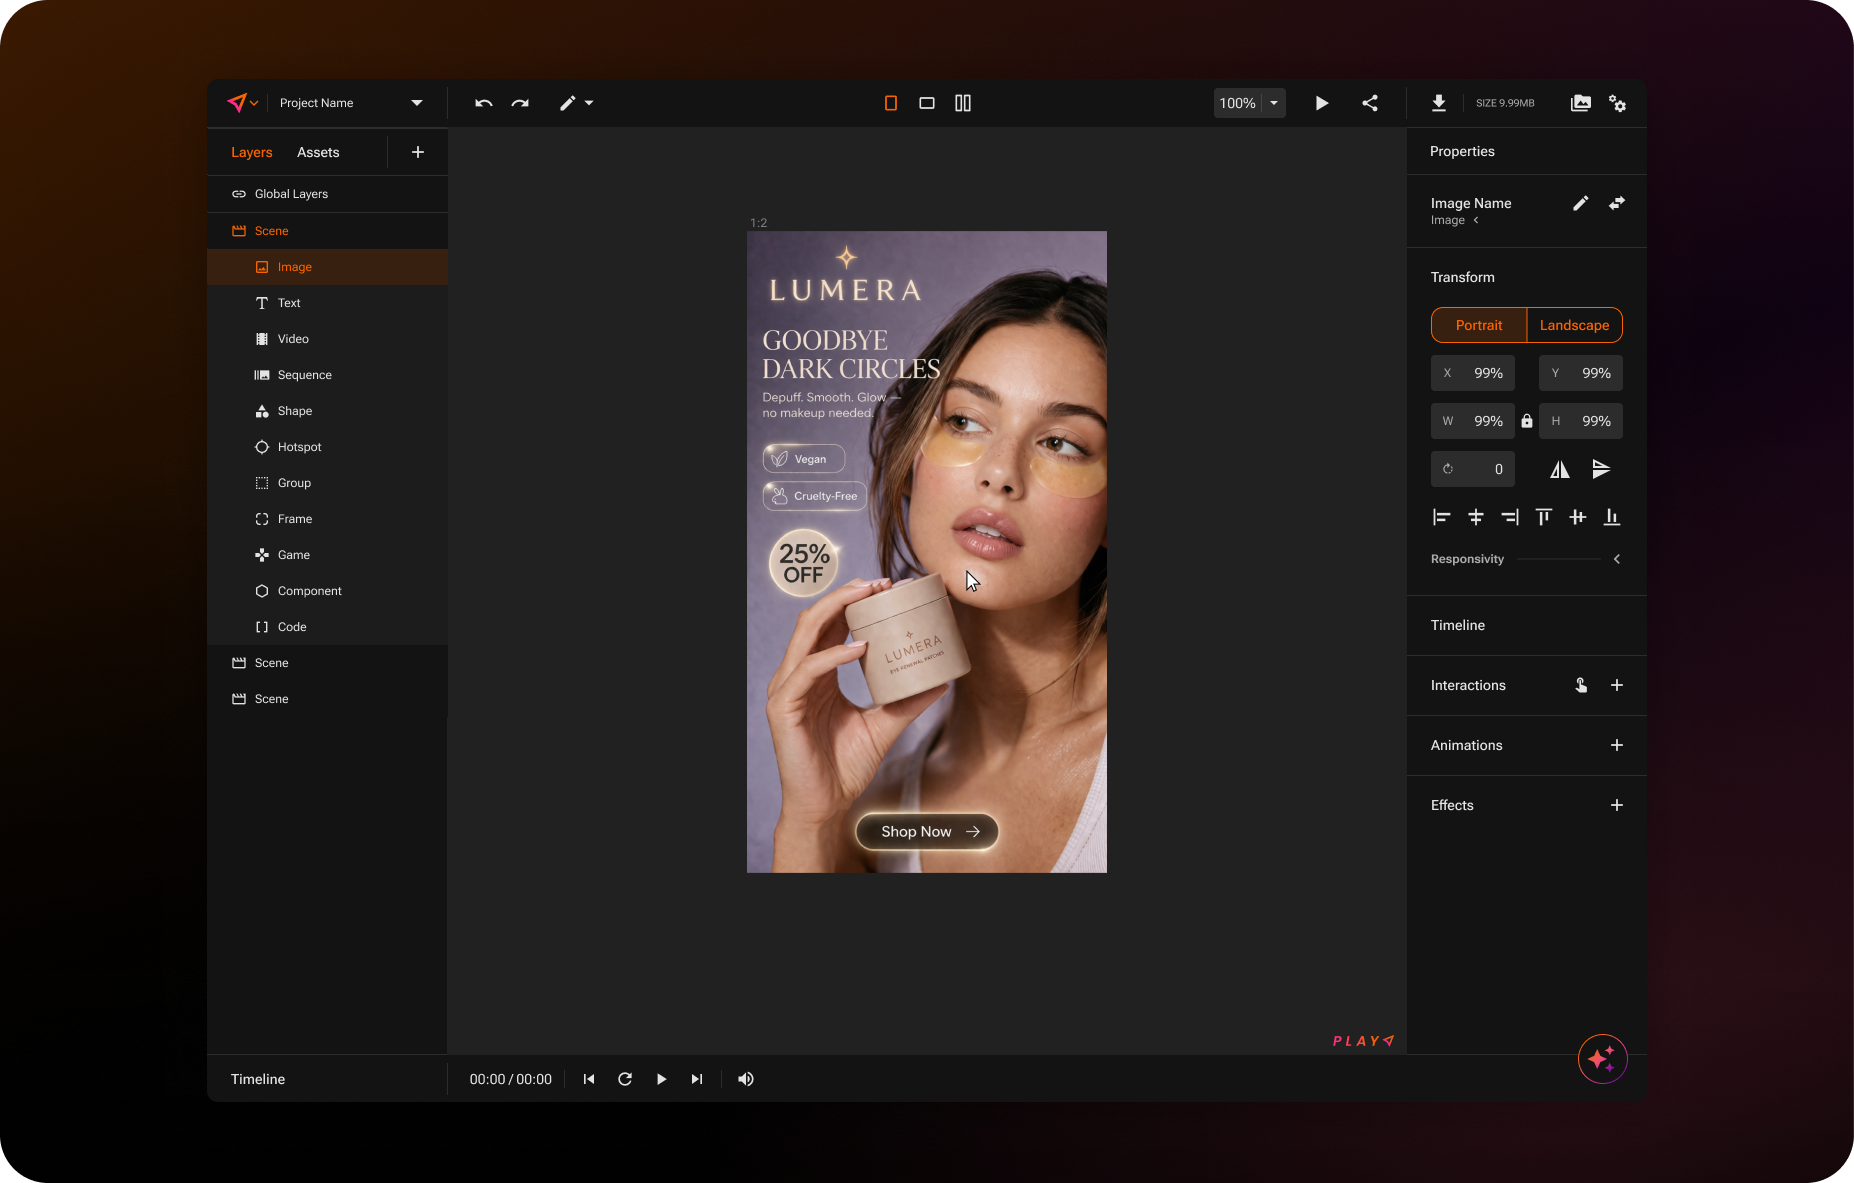
You can now add circle and rectangle shapes directly to your creatives as their own layer type. Add a shape from the Add Layer menu or with the S hotkey, then choose your shape from the dropdown and customize its color, opacity, and corner roundness right in the Properties panel. Also, importing a PSD now brings shapes in as native shape layers rather than flattened images. You can also swap any shape out for an image (or an image for a shape) at any time.
Read the Shape Layer Documentation
***
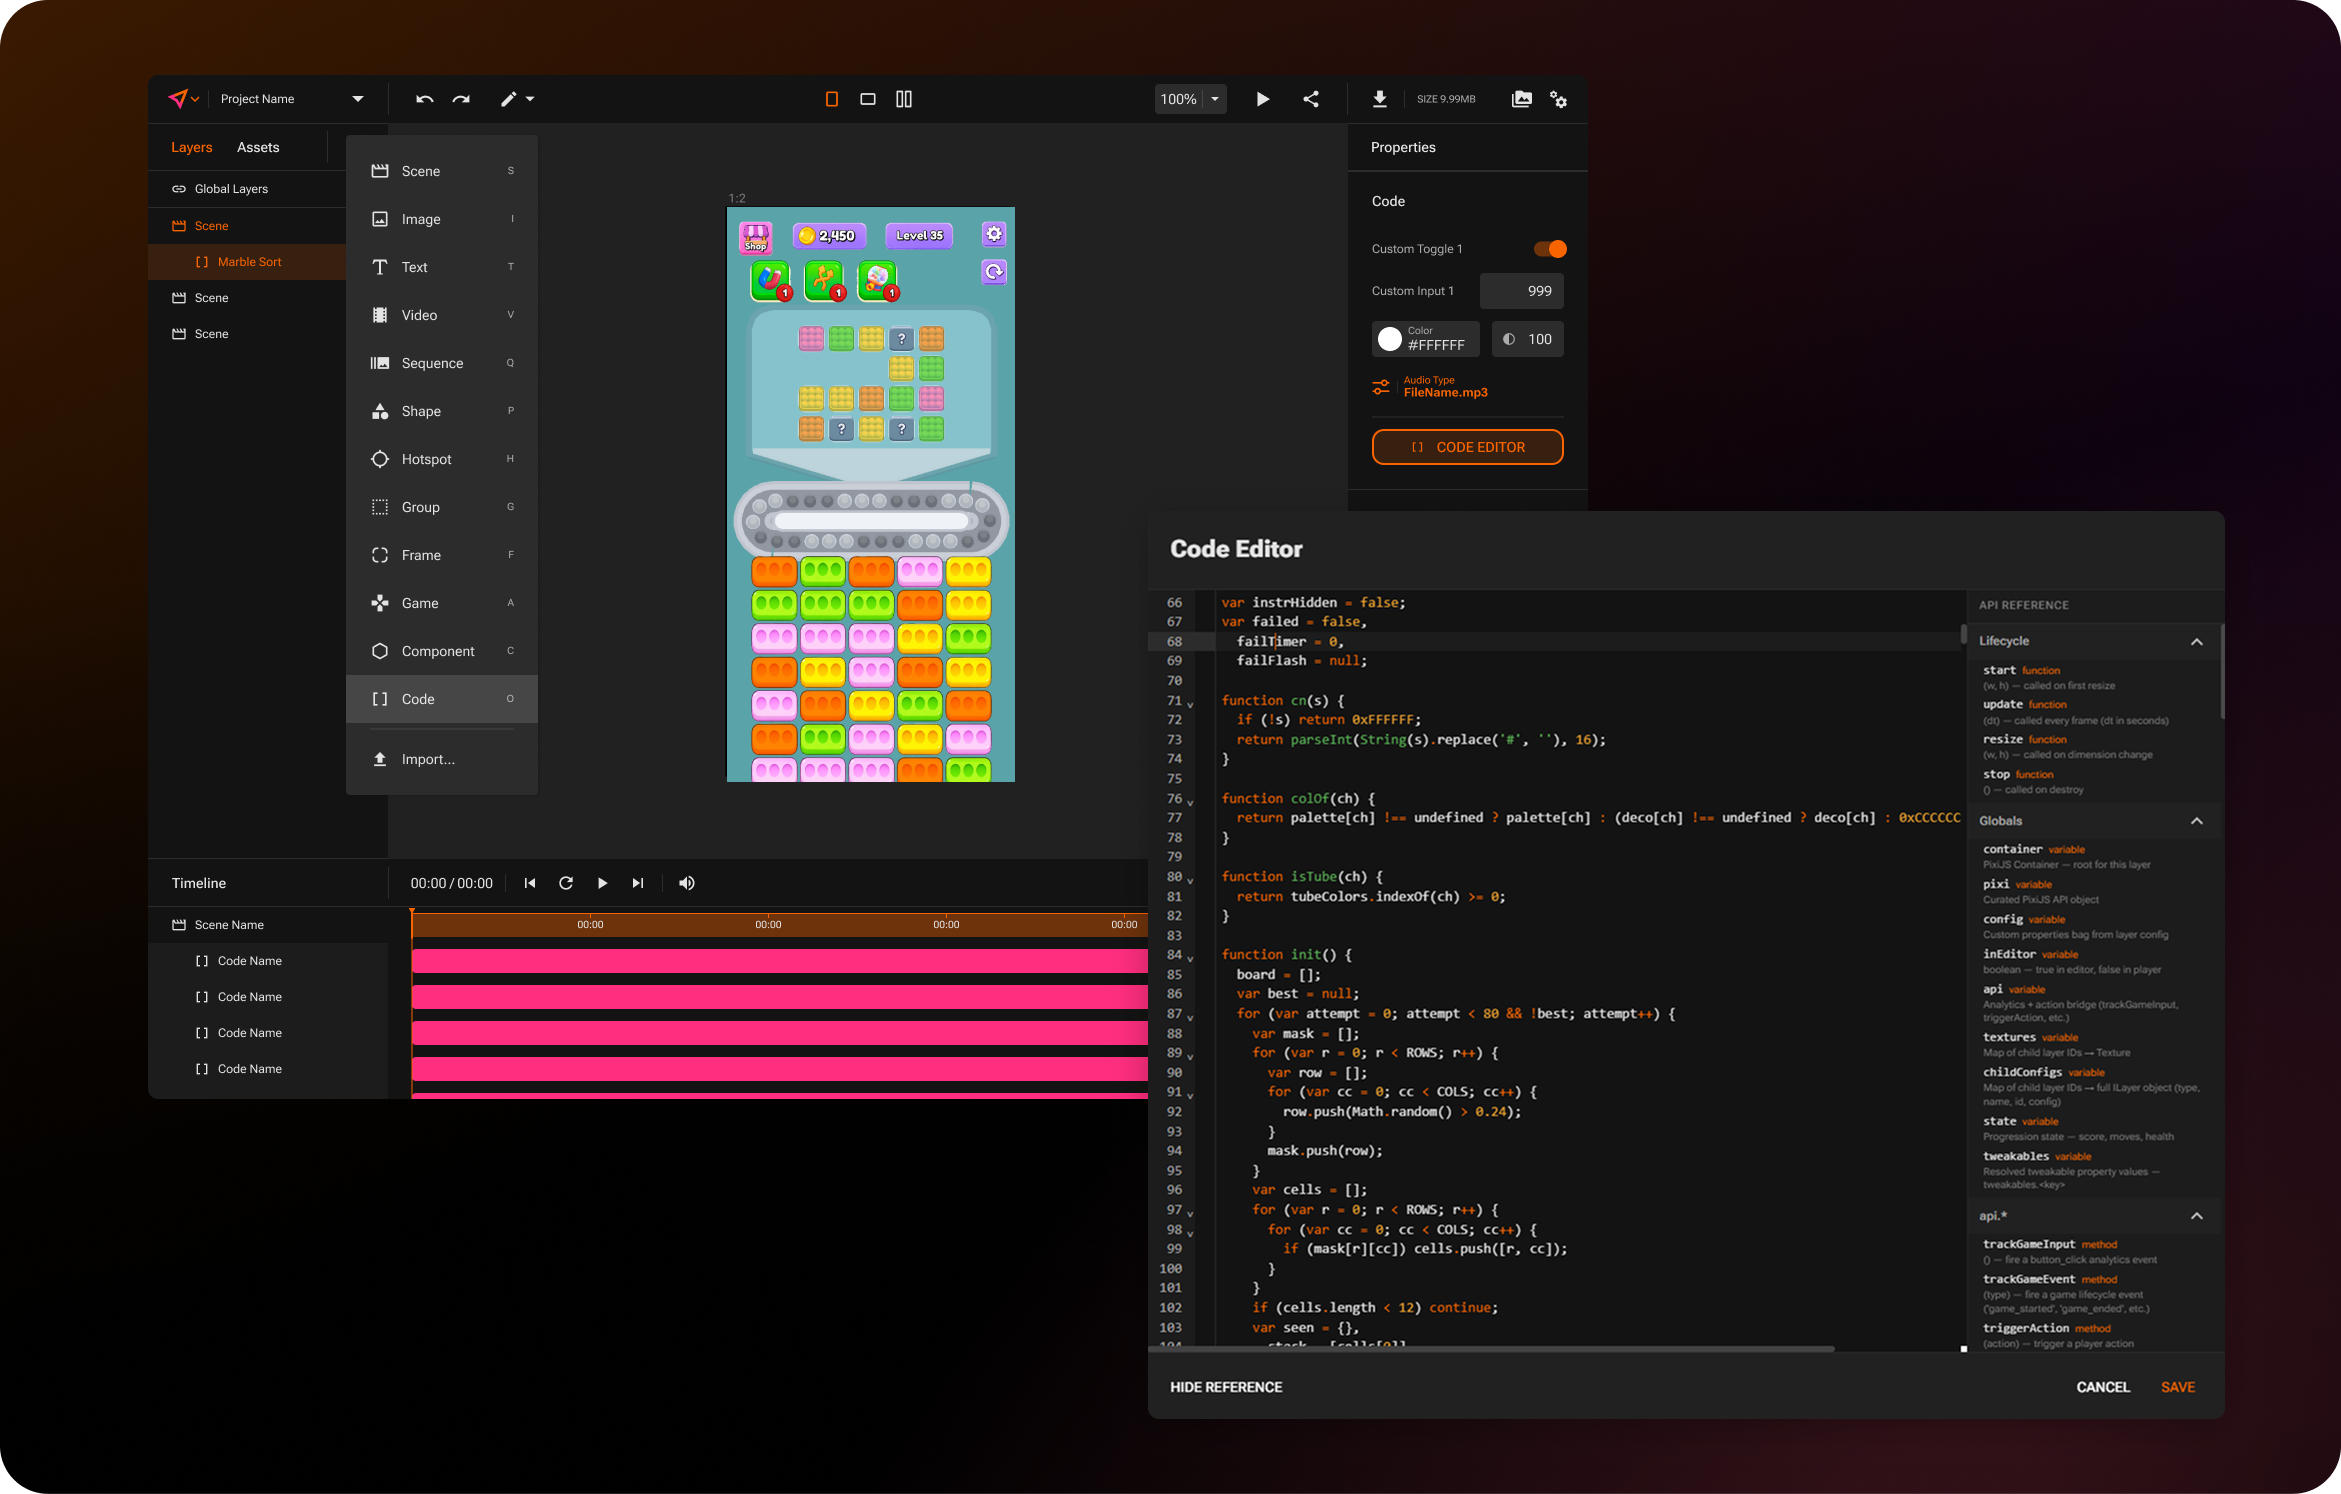
### **Code Layer** *Write your own code, right in PLAY*
Custom code is now in PLAY! Add a code layer from the Add Layer menu or with the hotkey O, then open the built-in code editor to write your own interactive visuals directly in PLAY. The editor includes autocompletion and an API reference sidebar to help you as you build, and you can pull image, text, and shape layers into your code through the layer's own asset panel. This opens up complex, custom interactivity that wasn't possible to build by hand before.
And this is just the beginning. The code layer works hand in hand with our AI chatbot to unlock a whole new level of creative power in PLAY, with much more on the way soon!
Read the Code Layer Documentation
***
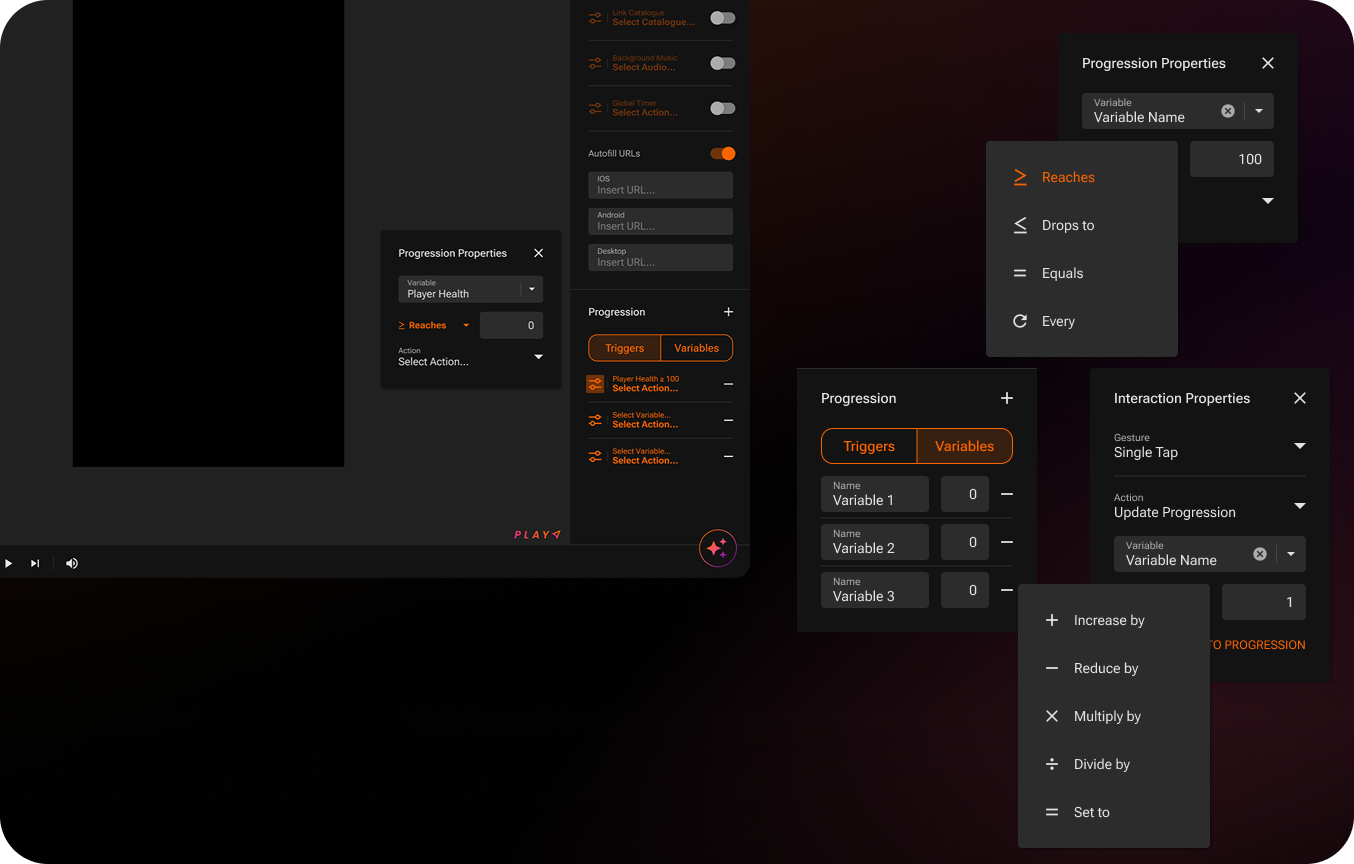
### **Progression Upgrades** *A flexible new progression system*
Progression has been rebuilt from the ground up. The old three-tab Score, Moves, and Health setup is replaced by a flexible two-tab structure: a Variables tab and a Triggers tab. In the Variables tab you can create any number of custom variables, name them, and set their default values. In the Triggers tab you set up actions that fire based on those variables. Each trigger watches a variable for a condition you choose, whether it reaches a value, drops to a value, equals a value exactly, or hits a value at a set interval, and then fires any action when that condition is met. You could reward a player the moment Score reaches 100, or fire an action every 25 points!
The Update Progression action is more powerful too. Instead of a simple increment, you can now choose how a value changes (Increase by, Reduce by, Multiply by, Divide by, or Set to) and apply that operation to one variable or several at once in a single action. Progress Text and Progress Bar also gain Min and Max input fields.
The same system now extends to games with a redesigned Game Progression section built on the same Variables and Triggers structure, so game-level progression works just like the rest of your project. Every game mechanic comes with its own set of default variables out of the box, like a starting score and points per action, so scoring behaves sensibly the moment you drop a game in. You can adjust those default values to tune each game's scoring exactly how you want and build triggers on top of them.
Your existing projects are migrated automatically, with Score, Moves, and Health carried over as variables so nothing breaks.
***
### **A Brand New Look** *Refreshed visuals across the platform*
CRAFTSMAN+ has a new look. The platform's primary color has shifted from purple to orange across the entire editor, from buttons and toggles to selected layers, tabs, on-canvas selection indicators, and analytics charts. Everything you already know is exactly where you left it, just dressed in the new brand.
***
### **Direct Upload to AppLovin** *Publish without leaving PLAY*
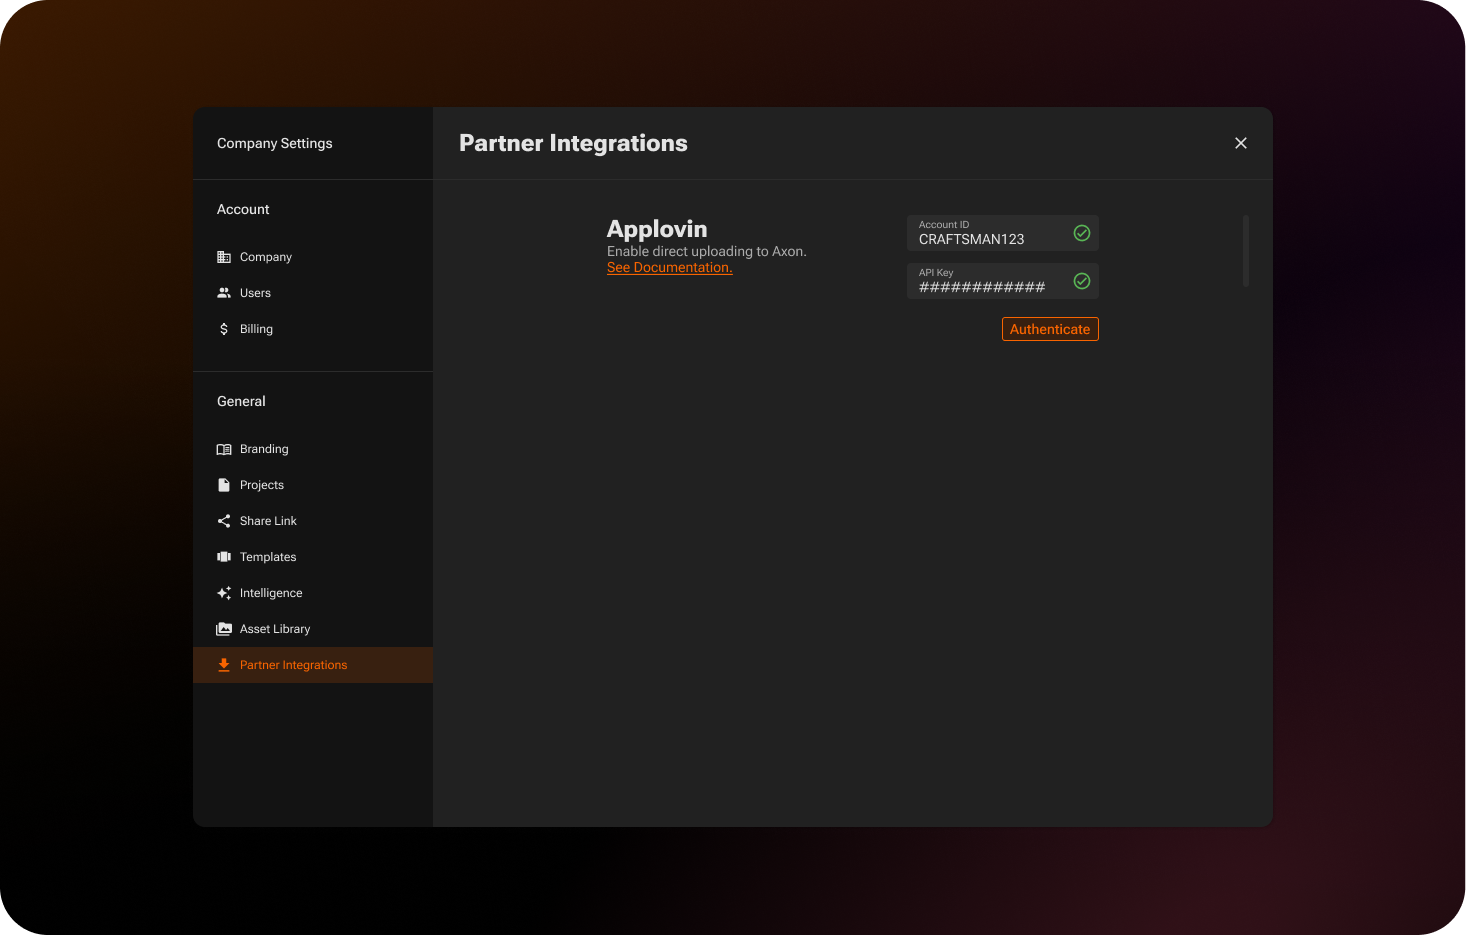
You can now send a playable straight to AppLovin Axon from the Export modal. When you select AppLovin under the Export options, you'll see a choice between Download and Direct Upload. To use Direct Upload, add your AppLovin credentials once in the new Company Settings section, which you reach by clicking your profile and choosing Company Settings, then opening Partner Integrations. Once configured, your playable uploads directly to Axon as part of the export, no manual download and re-upload required.
Read the AppLovin Documentation
***
### **Video Upgrades** *More control over video layers*
Video layers picked up a large set of upgrades this release:
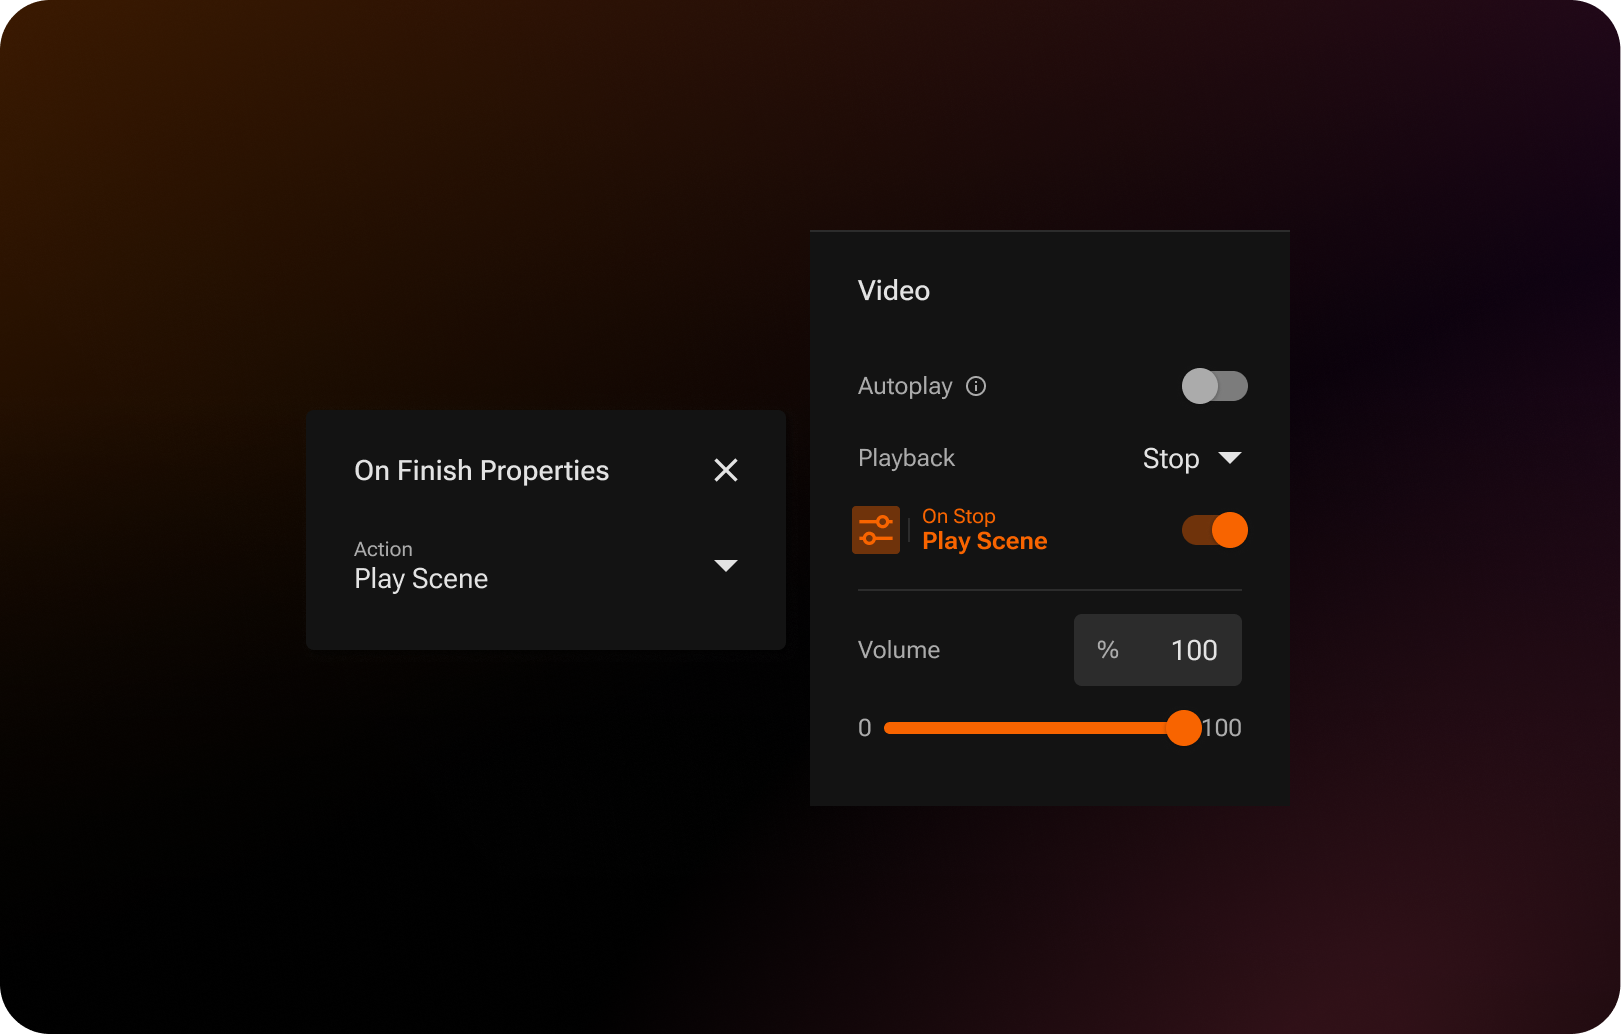
* A new autoplay toggle controls whether a video plays on its own.
* Playback options now include Stop and Loop.
* A new Playback action module lets you fire an action when a video finishes playing. How often it fires follows the playback type: once when set to stop or on every loop.
* Timeline notches show exactly when a video will stop, loop, or rewind, and the video track now stays unlocked so you can freely adjust its duration.
* An aspect ratio lock keeps videos in proportion when you resize them.
* You can now add video layers inside Carousel and Scrollable components.
* You can add more than one video to a single scene.
* You can now add videos to global layers
* When a video is the only one in a project, the scene duration now matches the video length automatically.
Read the Video Layer Documentation
***
### **Sequence Upgrades** *More control over sequence layers*
Sequence layers got a matching set of upgrades:
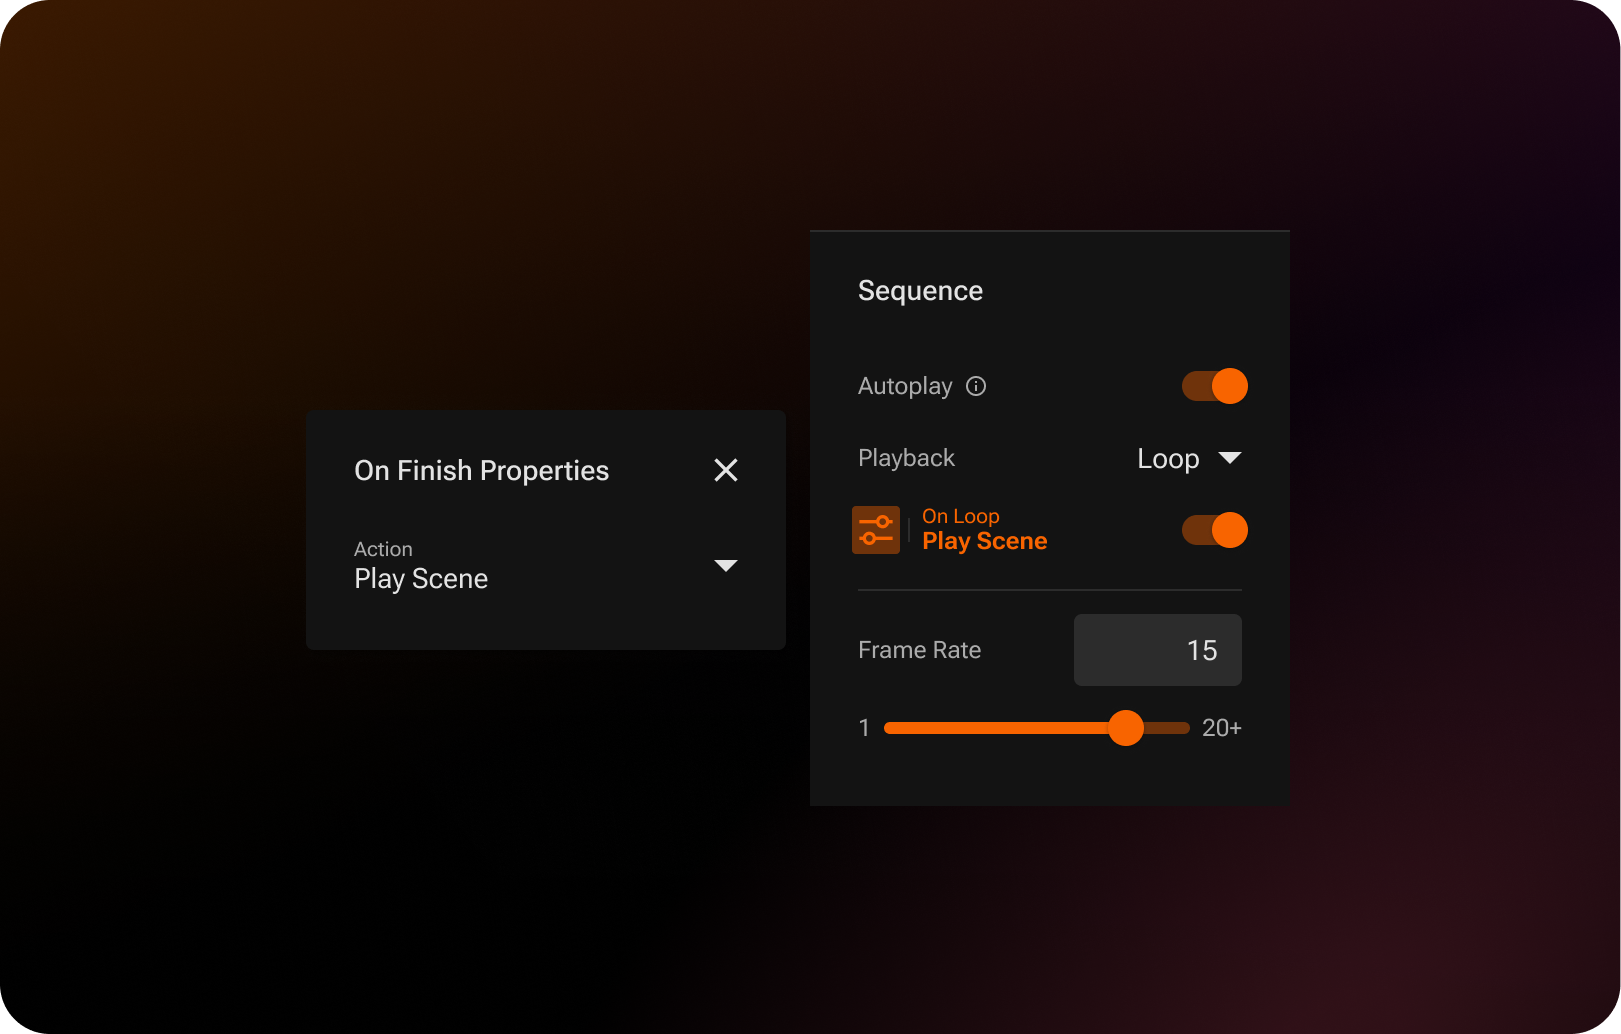
* A new autoplay toggle controls whether a sequence starts on its own.
* A new Playback action module lets you fire an action when a sequence finishes playing. How often it fires follows the playback type: once when set to stop, on every loop, or on every rewind cycle.
* Timeline notches show when a sequence will stop, loop, or rewind, and the sequence track now stays unlocked for free timeline adjustment.
* Changing a sequence's FPS no longer stretches or shortens its track.
Read the Sequence Layer Documentation
***
UI/UX IMPROVEMENTS
* **On Finish actions for every layer.** Every layer now has an On Finish module in its timeline section. Open it and choose an action that fires the moment that layer reaches the end of the timeline, giving you finer control over what happens as your creative plays out. The module is off by default, so your existing layers behave exactly as they did until you set an action.
* **Redesigned move modal.** Moving projects and assets is clearer now. The modal opens wherever you currently are rather than at the root, keeps persistent breadcrumbs so you always know where items will land, lets you search across all folders at once, and includes a button to create a new folder without leaving the modal.
* **Updated Photoshop Import preview.** The import modal's viewport now uses the same dotted background and zoom controls as the rest of the editor, making it easier to position and inspect your imported layers.
BUG FIXES
* Fixed an issue where a video could autoplay even when its scene was not set to autoplay.
* Fixed an issue where on-finish rewind did not rewind game layers correctly in preview.
* Fixed an issue where the fallback layer did not display when the Fallback option was selected in preview, share links, and exports.
* Fixed an issue where progress text and progress bars did not update in preview when a component was tracking a game condition.
* Fixed an issue where images in the asset library appeared squished when a second orientation was added to a project.
* Fixed an issue where Japanese and Thai dynamic language text was not centered correctly.
* Fixed an issue where adding a sequence layer as a global layer selected the wrong scene's layer.
* Fixed an issue where sequence global layers could unsync and break exports.
* Fixed an issue where a sequence inside a component game would not restart when the scene was replayed from the timeline.
* Fixed an issue where a looping sequence in a banner stopped early in preview.
* Fixed an issue where a looping sequence with a Launch URL or App Store action opened the link multiple times.
* *Release includes other minor bug fixes.*
{% endupdate %}
{% update date="2026-06-08" tags="new-release" %}
## **PLAY v5.1**
DESIGN FASTER. UPLOAD SMARTER. MORE PLAY.
### **New Features**
***
### **Photoshop Import** *Bring your PSDs straight into PLAY.*
Photoshop Import lets you bring a full PSD into your project in a single action, with every artboard becoming a scene and every layer landing in the editor ready to use. Open the Create Asset menu in the PLAY editor and select the new Import option to launch the Photoshop Import page.
**Here's how it works:**
* **Upload your PSD.** Click Upload PSD and choose a file. PLAY automatically parses your artboards and layers.
* **Review the import.** Once parsing is successful, you'll see thumbnails of every artboard alongside the full layer panel. Each layer gets a status icon: green for layers that imported cleanly, yellow for layers that imported but lost something along the way (an unsupported effect or missing font), and red for layers that couldn't be imported. Hover any icon to see exactly what happened.
* **Include or exclude artboards.** Click any artboard thumbnail to exclude it from the import.
* **Finish the import.** Click Import to bring everything into your project. The new scenes appear below your existing ones in the editor, ready to edit.
Read the Photoshop Import Documentation
***
### **A Redesigned Asset Upload Flow *****Faster uploads with full visibility every step of the way***
The Asset Library now has a fully redesigned upload experience built directly into the library itself, replacing the old upload window!
**Here's what's changed:**
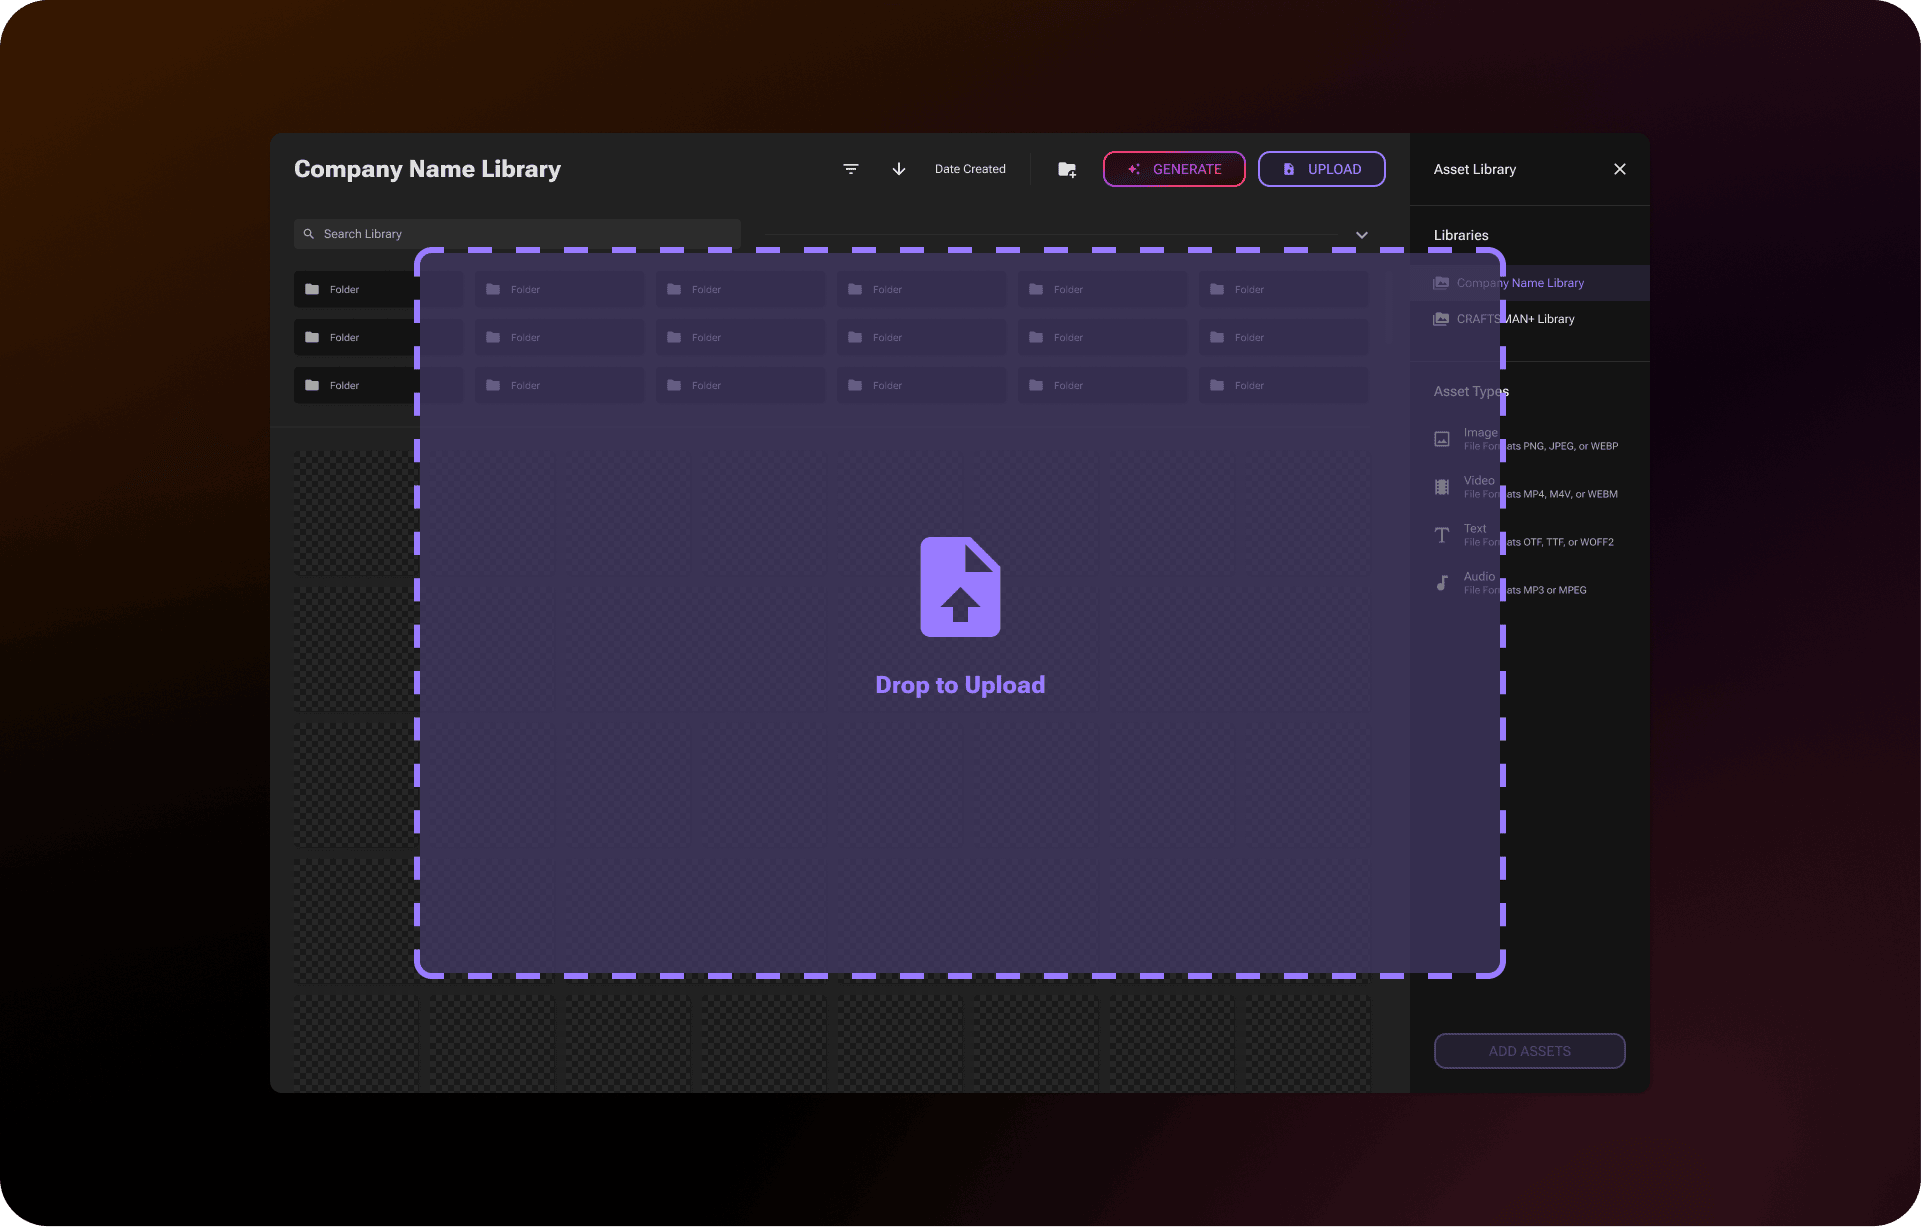
* **Drag to upload.** Drag files from your desktop onto the asset grid in the Asset Library or onto the editor directly.
* **Pending upload review.** Before anything uploads, you'll see every file listed. Unsupported or corrupted files are flagged with a red warning and a tooltip explaining the issue. Remove anything you don't want, then hit Upload — any unsupported files are filtered out automatically.
* **Real-time upload progress.** The right panel shows per-file progress as uploads run. Files upload in parallel and you can keep working in the editor while uploads complete in the background.
* **Upload complete and failed states.** When the upload finishes, you'll see a clear summary showing how many files succeeded versus failed. Successful uploads appear pre-selected in the asset grid ready to use!
Read the Uploading Assets Documentation
***
### **Keep Width & Keep Height Scaling *****Two new options for responsive layer behavior***
Two new scaling modes have been added to the layer scaling menu. **Keep Width** locks a layer's width regardless of viewport size, with height adjusting proportionally to preserve aspect ratio. **Keep Height** does the reverse, locking height and adjusting width. These give you more precise control over how layers respond across screen sizes alongside the existing scaling modes.
Read the Scaling Documentation
***
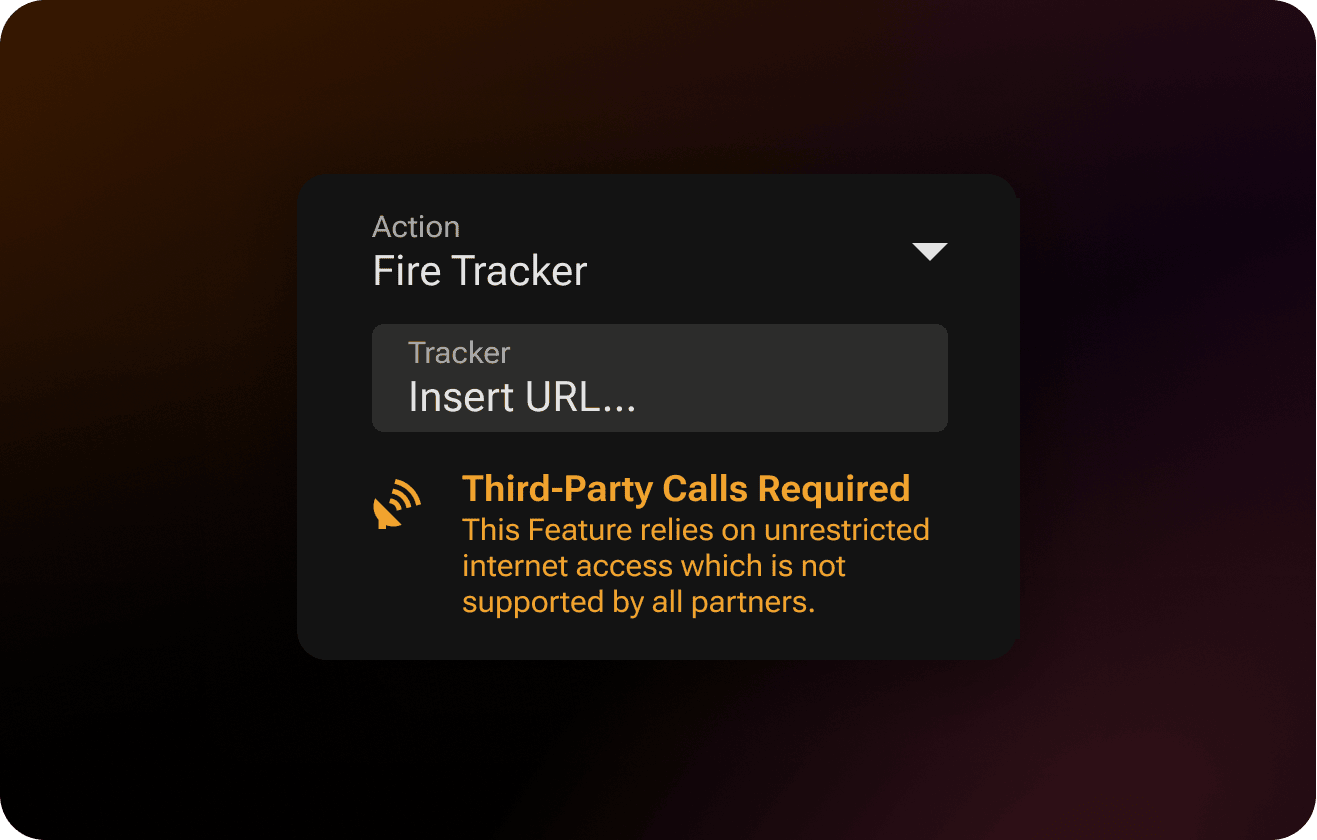
### **Fire Tracker Action *****Silently fire a tracker URL without interrupting the experience***
Fire Tracker is a new action that silently fires a tracker URL in the background, with no new window opening and no interruption to the playable. You'll find Fire Tracker in any action dropdown — including Interactions, Video and Sequence On Finish, Game Finish Conditions, and Scene Events. Select it from the dropdown, enter your tracker URL, and the action will fire whenever it's triggered. Fire Tracker is also fully compatible with catalogue URLs.
Read the Fire Tracker Documentation
***
### **Exclude Scenes from BG Music and Global Timer *****Granular control over which scenes opt out***
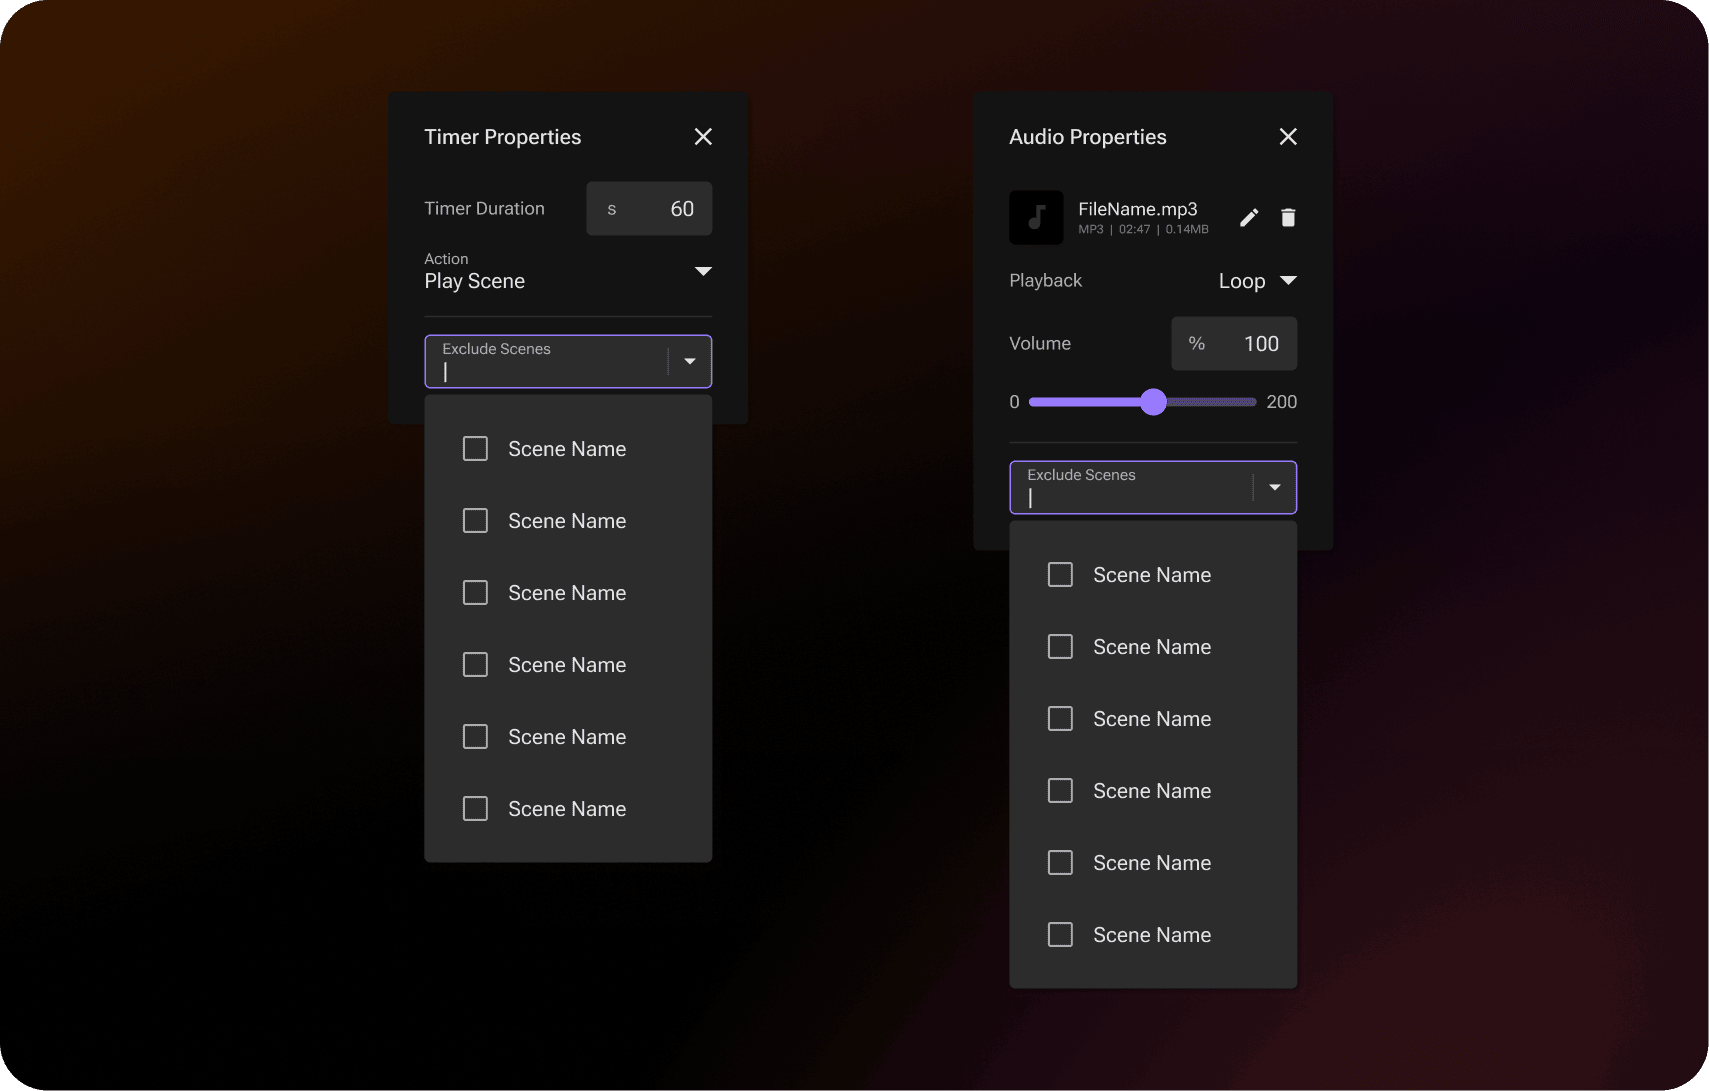
The "Play on End Cards" toggle has been replaced with a new Exclude Scenes dropdown in both the BG Music and Global Timer property popups, giving you scene-by-scene control instead of an all-or-nothing setting tied to End Cards. Open the dropdown to see every scene in your project with a checkbox, check any you want to exclude, and the BG Music or Global Timer will skip those scenes during export.
{% hint style="info" %}
***Note:** Existing projects that had "Play on End Cards" turned off are automatically migrated. Any scenes previously marked as an End Card are added to the Exclude Scenes dropdown, so your project behaves exactly the same after the upgrade.*
{% endhint %}
Read the Background Music DocumentationRead the Global Timer Documentation
***
### **Independent Text Properties Per Orientation *****Fine-tune text alignment and font size for each orientation independently***
Text alignment and font size can now be set independently for portrait and landscape on the same text layer. Adjust either property in one orientation and it stays put when you switch to the other, so you can fine-tune your text for each layout without overriding what you already set up.
Read the Text Layer Documentation
***
### **Paste Properties *****Copy specific properties from one layer to another***
Paste Properties lets you copy a layer and apply just the properties you want to another layer, instead of pasting the whole thing. Copy a layer, select your target, and open the edit controls dropdown to find a new Paste Properties option with a sub-menu of property groups: **All Properties, Transform, Timeline, Interactions, Animation,** and **Dynamic**. If a target layer doesn't support a specific group, that option is disabled and a "Cannot Paste Properties" toast appears. Pasted properties overwrite the target layer's existing settings.
Read the Paste Properties Documentation
***
UI/UX IMPROVEMENTS
* **Asset folder linking** The Asset Library now stays in context with the asset you're working on. Clicking replace opens the library directly to the asset's original folder, editing defaults the save location to that same folder, and after saving the library returns to where the asset lives instead of resetting to the root.
* **Choose between Original and Optimized assets** Selecting an asset in the Asset Library now shows Original and Optimized radio buttons with each version's format, dimensions, and file size, so you can pick the full-quality original or the web-optimized version when adding it as a layer. A new re-optimize button next to the Optimized row regenerates the optimized version at any time.
* **Pasting across projects** You can now copy layers, groups, and full setups from one project and paste them into another project open in a different tab. Copy/paste works between projects of the same type only (Interactive Ads to Interactive Ads, Banners to Banners).
* **Click through to layers beneath the bounding box** Clicking on a hotspot, group, or the transparent space of a text layer now passes the click through to whatever sits underneath, so you no longer have to deselect the top layer first.
* **Aspect ratio lock for video layers** Video layers now have an aspect ratio lock toggle in their properties panel, on by default. Resize with the corner handles to scale proportionally, or turn the lock off to resize freely.
* **Group layers unlocked by default** The aspect ratio lock on group layers is now off by default, making it easier to resize groups freely without first toggling the lock.
* **Global Timer module redesign** The Global Timer in the Settings Panel now follows the same module pattern as BG Music, with an on/off toggle and an expandable Timer Properties popup for duration, action, and exclude scenes.
* **Preview Press Effect in the viewport** Opening the Press Effect properties popup now applies the effect to your layer directly in the viewport, updating in real time as you adjust values.
* **Single Tap is the default gesture** New interactions added to a layer now default to Single Tap (matching the first-interaction behavior).
* **Volume slider for BG Music** The BG Music popup now includes a Volume slider that appears once you've assigned an audio file, giving you direct control over background music volume.
* **Project Listing sort settings persist** Your sort and ascending/descending preferences in the Project Listing now stay set when you navigate away and back.
* **Export rendering follows your orientation settings** Exports now render the correct orientation based on the Settings Panel configuration. Projects with both orientations enabled render each on the appropriate screen, and projects configured for only one orientation render that artboard on screens of the opposite orientation as well, masking anything beyond the base artboard size.
* **Updated Preview icon** The eye icon in the toolbar has been replaced with a play icon, making the preview action easier to identify at a glance.
* **Passwordless Platform Invites** The CRAFTSMAN+ new user invite email has been completely redesigned. It now features magic link sign in directly from the email.
BUG FIXES
* Fixed an issue where fonts uploaded in the editor did not immediately appear in the font selector, and where switching between variants of a project font did not always work correctly.
* Release includes other minor bug fixes.
{% endupdate %}
{% update date="2026-04-22" %}
## **PLAY v5**
A MORE MODERN EDITOR. MORE INTERACTION. MORE PLAY.
### **New Features**
***
### **Modernized Editor** *A faster, smoother, and more intuitive creative workspace*
PLAY's editor has been completely modernized under the hood. Powered by WebGL, the viewport is now significantly faster and smoother across the board. While your workflow stays the same, you'll immediately notice the difference.
**Here's what's changed:**
* **Unified viewport.** Portrait and landscape artboards now live side by side in a single viewport — no more switching between two separate views.
* **Redesigned transform controls.** The bounding box and transform handles have been updated with a cleaner, more modern look. Side handles have been removed in favor of transforming layers directly from the edges. The dedicated rotation node is gone — you can now rotate any layer by hovering just outside a corner, similar to tools like Figma.
* **Updated cursors.** All viewport cursors have been refreshed to match the new transform behaviors, giving you clearer visual feedback as you move, resize, and rotate layers.
* **Smoother controls across the board.** Layer movement, resizing, and snapping all feel noticeably smoother thanks to the new rendering engine. Trackpad controls have also been improved — two-finger drag to pan, pinch to zoom, and all the expected gestures work as you'd expect.
* **Improved zoom.** Zoom now has proper limits (1% to 2000%) and artboard size labels are displayed directly on the viewport for quick reference.
* **Upgraded Component Rendering.** iFrame and Carousel components now render directly in the editor instead of appearing as grey placeholder boxes, so you can see your actual content while you build.
Read the Viewport Documentation
***
### **Press Effect** *Add visual feedback to any interactive layer*
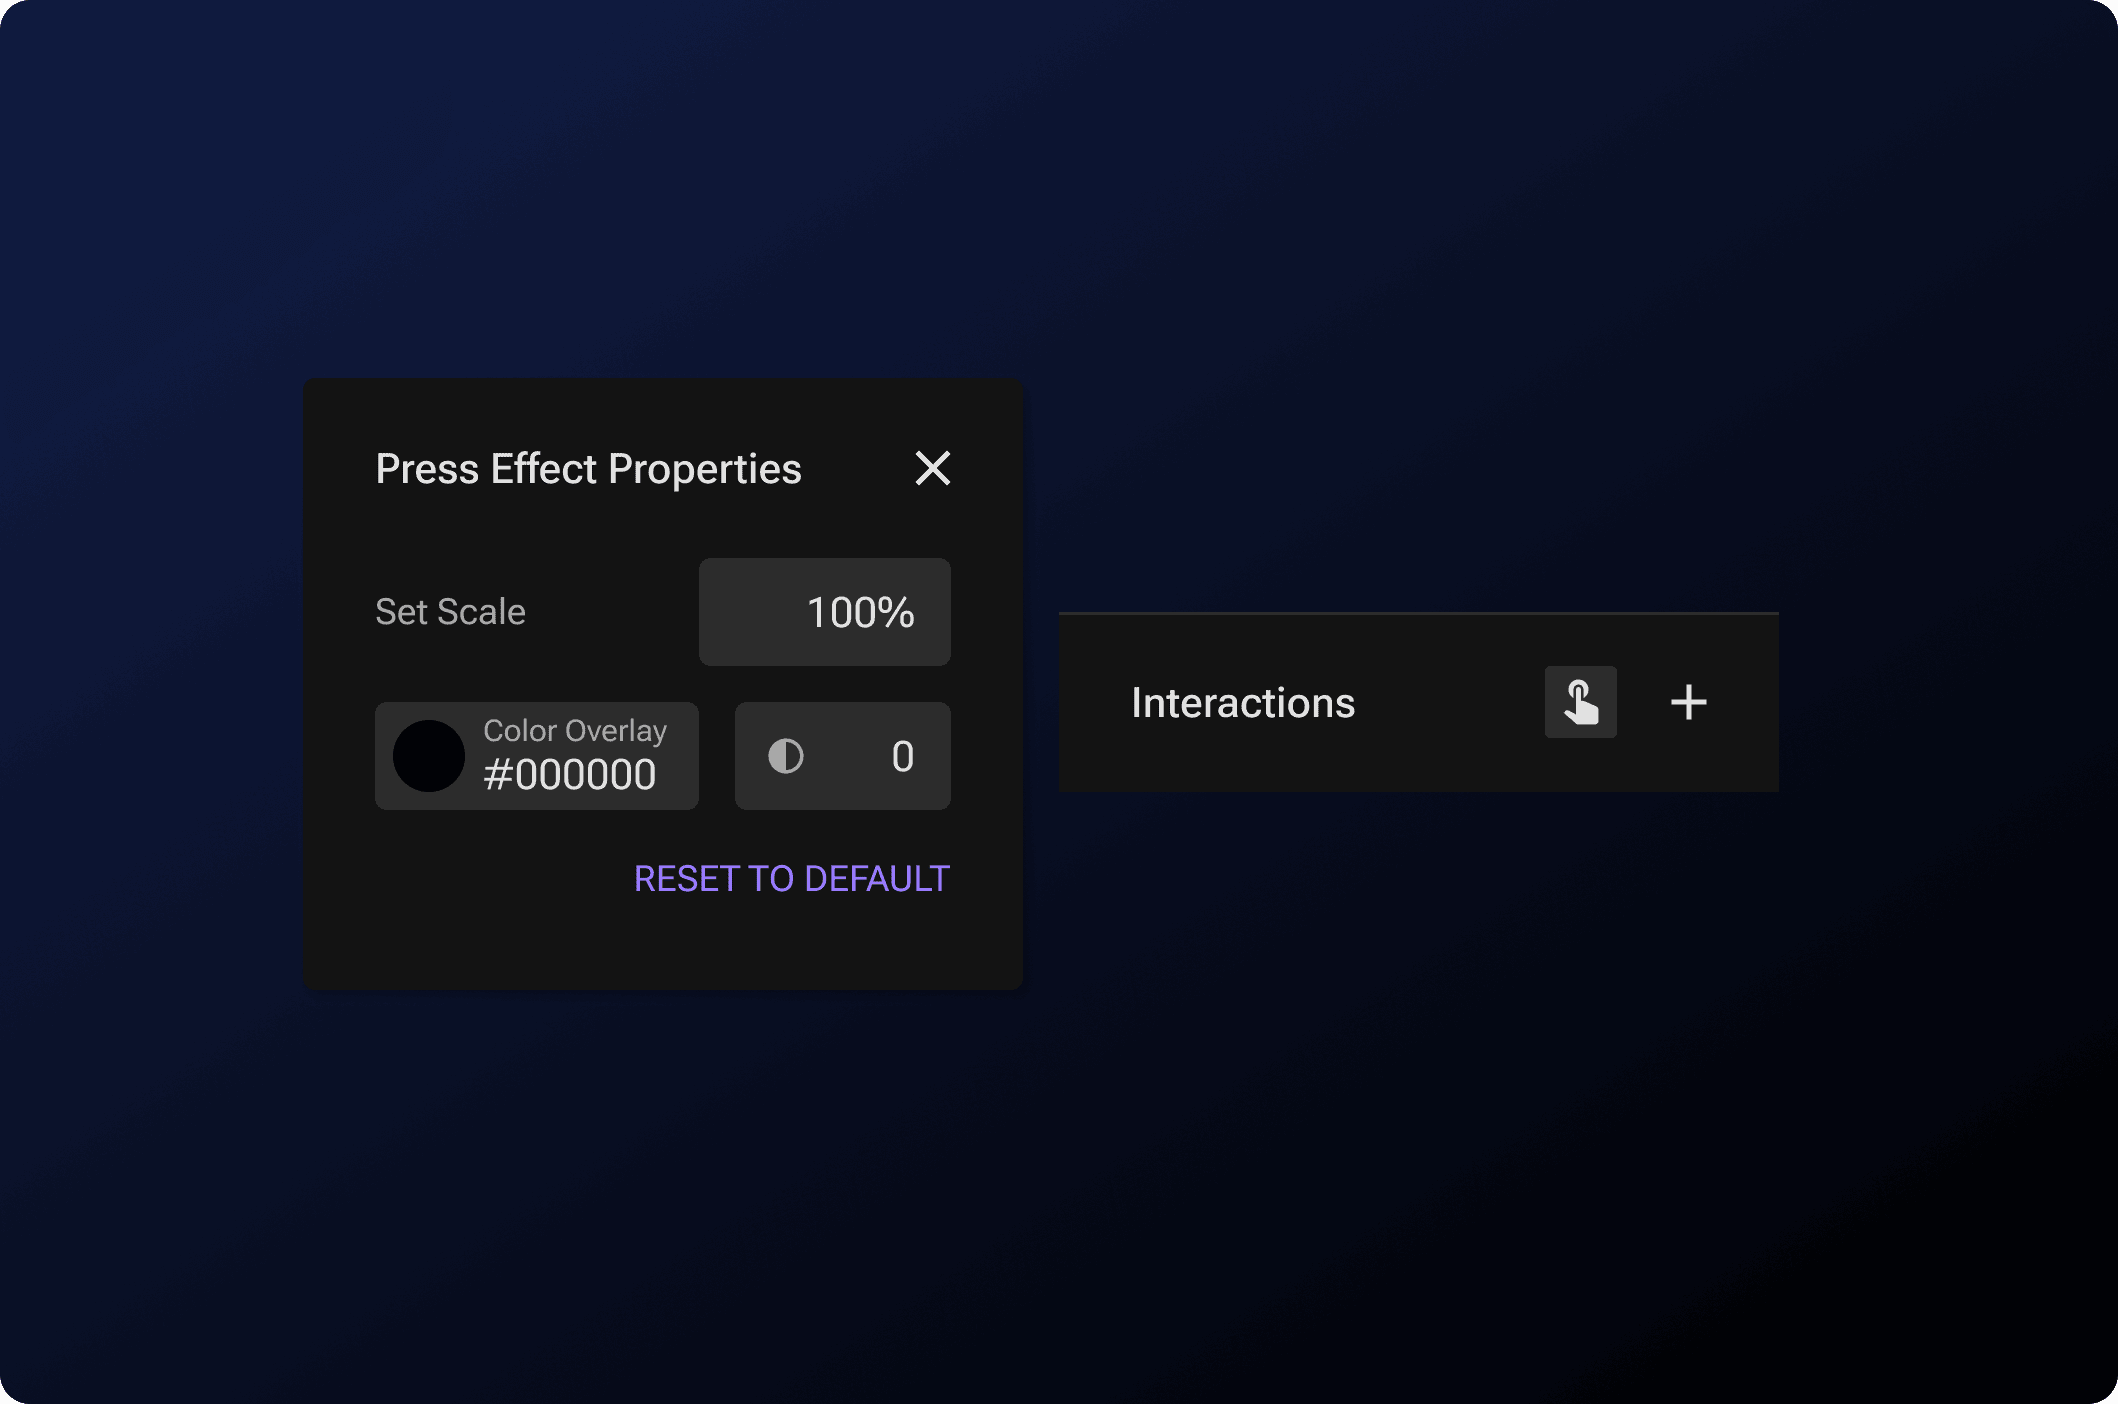
Press Effect is a new interaction property that lets you control how a layer looks the moment a user taps or clicks it. Add a scale change, a color overlay, or both to give your interactive elements that polished, app-like feel. You'll find the Press Effect button in the Interactions section of any layer's Properties panel. Customize the scale (0–1000%), apply a color overlay with adjustable opacity, and use the Reset to Default button to quickly revert changes. Press Effect works on standard layers and component layers alike.
Read the Press Effect Documentation
***
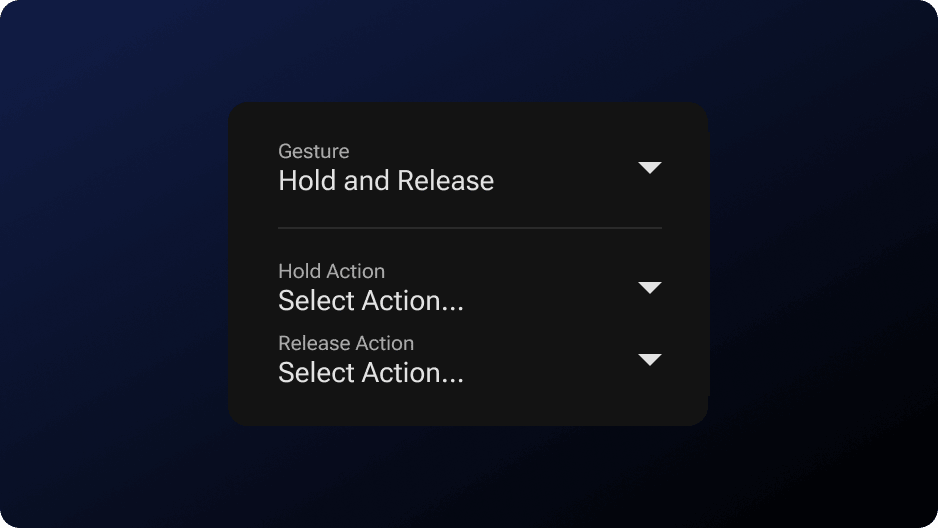
### **Hold and Release** **Gesture** *One gesture, two actions*
Hold and Release is a new gesture type that lets you trigger separate actions when a user presses down on a layer and when they let go. Set up a Hold Action and a Release Action independently — for example, play a video while the user holds and pause it when they release. You'll find Hold and Release in the Gesture dropdown within the Interactions section. We recommend adding instructional text like "Hold to Play" so users know the interaction is available.
Read the Hold & Release Documentation
***
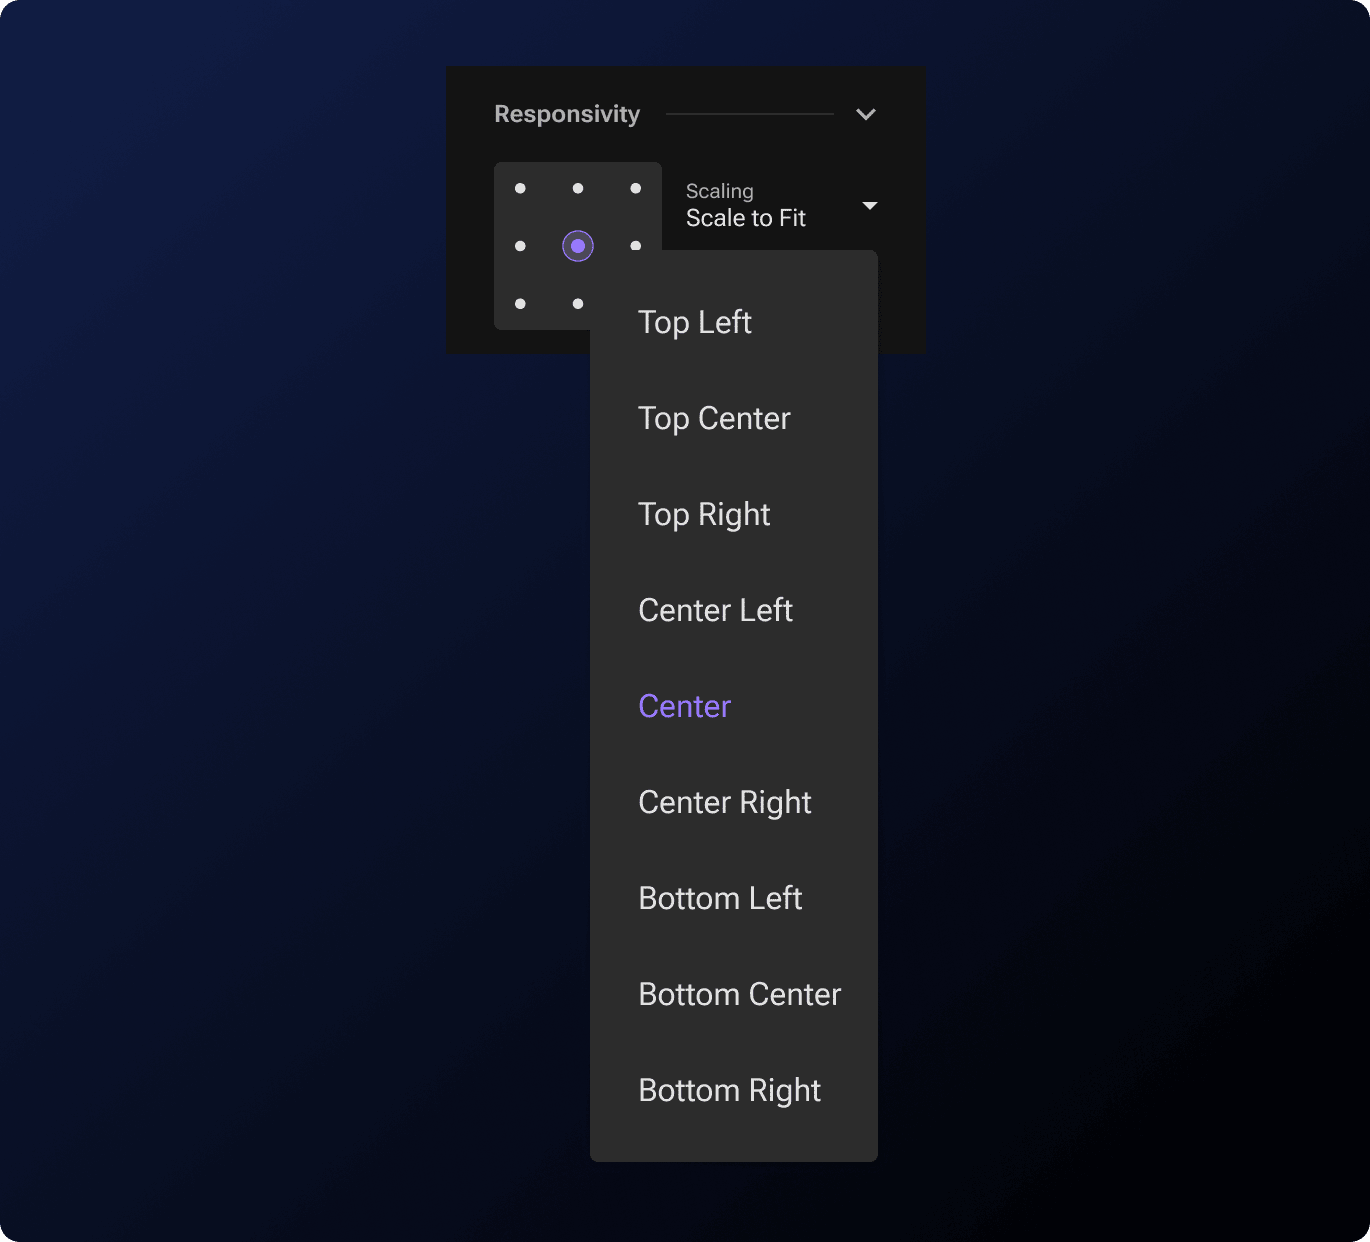
### **Anchor Points** *Fine-tune how layers respond across screen sizes*
Anchor Points set the reference point a layer uses for transform properties, pinning, and scaling across different devices. Found in the Responsive section of each layer, the dropdown offers nine positions (Top Left through Bottom Right) with Center as the default. Updating a pin will auto-update the Anchor Point to match, but changing the Anchor Point won't affect the pin, so existing workflows stay the same. ***Note:** Animations are not affected by Anchor Point and will continue to use center origin.*
Read the Anchor Point Documentation
***
### **Engine Compression** *Dramatically reduce your exported file size*
You can now compress your playable's engine at export time, saving approximately 400KB on most projects. In the Export modal, open Export Settings and toggle on **Engine Compression**. When enabled, any partner that exports as .html will include a compressed version of the rendering engine, resulting in significantly smaller file sizes without any changes to how your playable looks or performs. The toggle is off by default, giving you full control over when to use it.
***Note:*** ***Engine Compression is not supported on iOS 16.3 and earlier**. If your campaign targets older iOS devices, we recommend leaving this toggle off.*
***
#### **iFrame HTML & ZIP Upload** *Skip the hosting — upload HTML creatives directly*
The iFrame component now supports direct file uploads. In addition to URL and Embed Snippet, you can now choose **HTML** or **ZIP** from the Format dropdown to upload self-contained HTML5 creatives straight from your computer — no external hosting required.
Select **HTML** to upload a single `.html` file, or **ZIP** for multi-file projects with assets like CSS, JavaScript, and images (must include a root `index.html`). PLAY handles the upload, hosts the file on CDN, and loads it into the iFrame automatically.
This is especially useful for embedding third-party HTML5 creatives, mini-games, or rich media units that were previously a hassle to host separately before pasting a URL.
Read the iFrame Documentation
***
### **Bulk Adding** **Layers** *Import multiple images at once*
You can now select and add multiple image assets as new layers in a single action. When adding a new Image layer, the Asset Library now supports multi-select — choose your images, and each one is automatically created as its own layer in the order you selected them. This saves significant time when building out scenes with many visual elements. **This currently works for image layers only, videos will be coming soon.**
***
UI/UX IMPROVEMENTS
* **Updated default font** System fonts have been removed and replaced with a new default font from the Craftsman+ library, ensuring consistent text rendering across all devices and exports.
* **Smarter asset sizing** Imported assets now scale proportionally to the canvas rather than all appearing at the same default size. When you add an image, video, or sequence asset, PLAY treats the canvas as if the longer side is always 1024px and scales your asset relative to those dimensions. Images maintain their visual proportions relative to the canvas dimensions, so what you import looks closer to what you’d expect.
* **Dynamic Location radio buttons** Dynamic Location selections now use radio buttons per section, making it easier to configure and manage location-based content.
* **Faster Pathview loading** Pathview and preview screens now load significantly faster with improved caching and parallel processing. Subsequent visits are near-instant.
* **Help button removed** The "?" help button has been removed from the editor toolbar for a cleaner workspace. A new help system will be coming soon!
BUG FIXES
* Fixed an issue where the Match 3 game animation appeared choppy and played too fast in preview and export.
* Fixed an issue where the Item Slicer game displayed broken slice animations, with items duplicating and showing shadow-like artifacts.
* Fixed an issue where the share link would go to a black screen after interacting with a game.
* Fixed an issue where playables would crash mid-way through playing the Item Slicer game.
* Fixed an issue where the Wipe Away game's finish condition would not complete in landscape orientation after switching orientations mid-experience.
* Fixed an issue where obstacles and platforms barely spawned in the Platformer game when collectible density was set to ‘High’.
* Release includes other minor bug fixes.
{% endupdate %}
{% endupdates %}
---
# Agent Instructions
This documentation is published with GitBook. GitBook is the documentation platform designed so that both humans and AI agents can read, navigate, and reason over technical content effectively. Learn more at gitbook.com.
## Querying This Documentation
If you need additional information that is not directly available in this page, you can query the documentation by asking a question.
Perform an HTTP GET request on the following URL with the `ask` and `goal` query parameters:
```
GET https://help.craftsmanplus.com/home/release-notes/readme.md?ask=&goal=
```
`ask` is the immediate question: it should be specific, self-contained, and written in natural language.
`goal` is what the user is ultimately trying to achieve, the reason they need the answer. Sharing it helps GitBook give you a better, more relevant answer. A goal is most helpful when it describes the outcome the user wants rather than restating the question. For example, with `ask=how do I create an API token`, a goal like `automate deployments from our CI pipeline` lets GitBook tailor the answer to that use case.
The response will contain a direct answer to the question and relevant excerpts and sources from the documentation.
Use this mechanism when the answer is not explicitly present in the current page, you need clarification or additional context, or you want to retrieve related documentation sections.
.jpg?alt=media&token=08b0e50e-dbc3-4bf2-9e3f-7ee06bde4d3d)


.jpg?alt=media&token=8535981a-f085-4366-aa5f-181074561df3)


.jpg?alt=media&token=dabc4310-0871-43d7-9e32-5a4764334055)
.jpg?alt=media&token=c2cd493c-2140-44ce-8336-91624faac693)


.jpg?alt=media&token=278e8902-88f0-4d8a-a022-20c35fe3c61e)

.png?alt=media&token=3c2720e3-c528-4c87-8be3-6fe08c5f15e4)


.png?alt=media&token=cc40ff79-0a86-41c3-a006-661fca42c3a0)
.png?alt=media&token=86bbaa96-7b65-4349-acbc-6f6809d3dac4)
.png?alt=media&token=1ee8461d-5401-42d8-b4d5-6de305281b74)


.png?alt=media)
.png?alt=media)
.png?alt=media)
.png?alt=media)
.png?alt=media)
.png?alt=media)
.png?alt=media)
.png?alt=media)